Thursday, 16 August 2012

Get rid of Trojan.Dropper.Bcminer (Uninstall Guide)

A combination of ZeroAccess rootkit and Trojan.Dropper.Bcminer goes viral, at least in our state. Our friend, who has a small computer repair shop, told us he had to work overtime in order to repair all the computers that got infected with apparently the same nasty virus. This makes us wonder whether cyber crooks can target very small areas or was it just a coincidence? Too bad he didn't provide any logs from those infected machines.

We believe it could have been a legitimate self-hosted WordPress site or multiple sites hosting malware. That would make sense since all victims live in the same area and share the same interests, mostly. Besides, recently some antivirus companies reported that they have spotted a major malware campaign spread via infected WordPress websites using hidden iframes to victimize computer users. This approach is not new but still rather effective due to hundreds of thousands websites, especially self-hosted blogs, that are not being updated by their owners regularly. Malware authors can easily hide iframes and load malicious code from websites controlled by criminals; we usually call it a drive-by attack.

You can learn more about ZeroAccess rootkit here. Trojan.Dropper.Bcminer was something new to us and since our friend sent a sample of this infection to us, we decided to run it in our test environment. So, we ran the malicious file, rebooted the computer and yippee, we had a perfectly working combination of a nasty rootkit and Trojan.Dropper.Bcminer. Later we found out that a search results redirect module was also installed on our computer. What is more, Trojan.Dropper.Bcminer downloaded additional files from remote web servers which were necessary to start BitCoin mining. To learn more about BitCoins and how criminals use this legitimate service to earn money, please read this article about RiskTool.Win32.BitCoinMiner. The malicious files very requested from web sever closely related to BlackHole exploit kit. It wasn't surprising because this exploit kit is probably the most popular among cyber crooks right now.

We have to admit, that such malware combination makes sense. Cyber crooks earn money by redirecting victims to spam websites while they use their computers. When victims are away from their computers, cyber crooks use bitcoin mining modules to earn money as well. So, theoretically, they can earn money all day long.

Usually, our friend uses free malware removal tools to clean infected computers. His favorite is Malwarebytes' Antimalware. But this time, he was rather disappointed with this software because it just couldn't properly remove the infection.

As you can see in the image below, Malwarebytes finds malicious files and tries to remove them (reboot is required).


However, when the infected computer came back on, the remnants of this infection downloaded core malware components from web severs controlled by criminals and attempted to install Trojan.Bitminer and other malicious files once again. So, the Trojan.Dropper.Bcminer keeps coming back.


Running a quick system scan with other anti-malware tools clearly showed that Malwarebytes' couldn't remove malicious files from the infected computer.


C:\WINDOWS\assembly\GAC\Desktop.ini

Of course, Malwarebytes is a great tool, we use it very often but we do not rely on this single too only, you guys shouldn't either. In this case, Spyware Doctor did a great job and removed all the malicious files. To remove Trojan.Dropper.Bcminer and associated malware from your computer, please follow the removal instructions below. If you have any questions or valuable remarks, please leave a comment below. Good luck and be safe online!

http://deletemalware.blogspot.com


Trojan.Dropper.Bcminer removal instructions:

1. First of all, download TDSSKiller and run a system scan. This great utility will find and remove rootkits. Reboot your computer if required.

2. Then, download recommended anti-malware software (direct download) and run a full system scan to remove this virus from your computer.

Tell your friends:

Monday, 13 August 2012

Phone Shaped Pop-ups In Lower Right Hand Corner and Random Redirects (Uninstall Guide)

Some of our readers have been having an awful time trying to remove malicious software that constantly redirects them to spam or even malicious websites while browsing the net and displays either a square or phone shaped pop-up in the bottom right hand corner of their web browsers. Sometimes a pop-up window resembles a video screen of ads, please see the images below.

Previously, we wrote about Trojans horses that had a very similar payload. These Trojans displayed "Recommended for You" pop-ups in the lower corner of the web browser. It actually doesn't matter which browser you use because this happens on all major web browsers, whether it would be Internet Explorer, Mozilla Firefox or Google Chrome. Cyber criminals decided to remove "Recommended for You" notification from their ads probably because victims could easily Google this text and find out that their computers are infected with malicious software. Now, they usually display a smart phone shaped ads with links and also video screen ads.

Here’s what a typical phone shaped ad looks like:


And here’s another one titled "you are missing a plugin to play videos".


A slightly different approach but we believe it's still very effective. At the time of writing, this fake fake video update ad was redirecting users to two different websites but they both promoted the same free video player. Most likely, cyber crooks earned commissions from every successful install they made. While that's clearly not the most profitable traffic monetization model we’ve seen so far, it’s still an option and cyber crooks successfully use it.

We found at least three different Trojans horses that have exactly the same payloads: web browser redirect + annoying phone shaped pop-ups. Of course, there might be hundreds of them but we were looking at the most popular ones. All these Trojans displayed pop-ups in the bottom right hand corner of the web browsers and redirected users to spam websites. Now, one of those Trojans used very aggressive methods o hide its presence on the infected computer. It even made our antivirus software to disappear. That means we have encountered different families of Trojans.

What is more, very often these Trojans come bundled with rootkits which makes the removal procedure a lot more complicated than just simply removing a Trojan horse. Most antivirus programs handle Trojan horses very well but fail to remove rootkits. Thankfully, you can use free utilities to remove rootkits from infected computers, for example TDSSKiller, if your antivirus program can't remove them.

One more thing about this infection – it changes Windows Hosts file. Normally, it doesn't lock the Hosts file itself but we've seen a couple of Trojans that not only changes the file so that it would load spammy sites but also prevent further modifications. So, if you can remove malicious lines manually, please use this great Microsoft utility called "Fix it".

To remove phone shaped pop-ups in the bottom right hand corner of your web browser, please follow the removal instructions below. Should you need any further assistance, don't hesitate to contact us or just leave a comment below. Good luck and be safe online!

http://deletemalware.blogspot.com


Removal instructions:

1. Download recommended anti-malware software (direct download) and run a full system scan to remove this malware from your computer.

3. To reset the Hosts file back to the default automatically, download and run Fix it and follow the steps in the Fix it wizard.

4. Remove files from Windows %Temp% folder.

Tell your friends:

Saturday, 4 August 2012

Windows Ultimate Safeguard (Removal Guide)

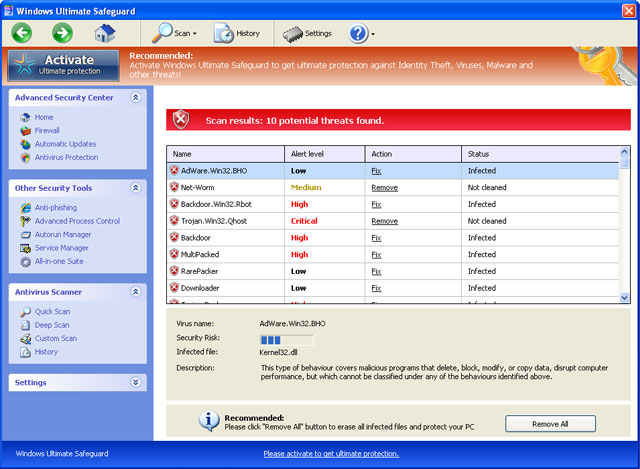
A big thank you goes to Matt from Rocky Mountains Colorado who brought our attention to a new rogue antivirus program called Windows Ultimate Safeguard. It's not a new rogue antivirus program per se, just a different name. This fake program belongs to the FakeVimes scareware family. Cyber crooks repack and rename their bogus software daily so it's rather difficult to track them all.

Matt told us he got infected with this malware yesterday. Sorry for those who fell victims to this scam. You guys probably won't get your money back unless your credit card company has some very strict regulations, etc.

Windows Ultimate Safeguard is promoted via fake online virus scanners, you know, those claiming that your computer is infected with viruses, spyware and other nasty crap. However, Matt got it from a fake video streaming website. Apperently, it was one of those fake sites that ask you to download adobeflashplayer.exe or something similar in order to watch requested video.


Once installed, this rogue antivirus program begins to scan your computer for malicious software. It may detect like ten or more infected files on your machine. But don't worry, they are all fake. Fake scans results are meant to scare you into purchasing the rogue antivirus program. DO NOT pay for it!

Windows Ultimate Safeguard disables Task manager, Resgistry editor and other system utilities. Hitting Ctr+Alt+Del brings up the rogue program instead of Task Manager.

It may associanoly block your web browser whether it would be Internet Explorer or Google Chrome. For some strange reasons it doesn't block them all the time so you may have enough time to download legitimate malware removal software.


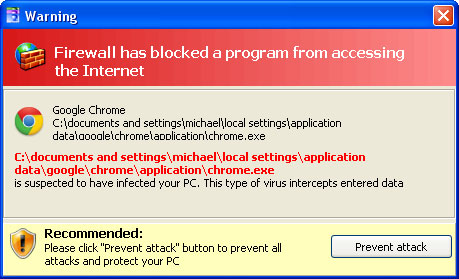
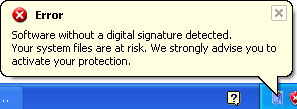
Just like any other scareware, Windows Ultimate Safeguard displays fake security alerts. Not were aggresively thought.


The rogue program doesn't start in Safe Mode with Networking. Good news in case you can't download or run any anti-malware software in Normal Mode. Three removal methods can be used to remove Windows Ultimate Safeguard virus from your computer:
  1. Using fake registration key
  2. Using Safe Mode With Networking
  3. Removing malicious files manually
One way or another, you need to scan your computer with anti-malware software to properly remove the rogue program itself and possible remnants or additionally installed malware. Please note, it may come bundled with rootkits and other significantly sophisticated malware.

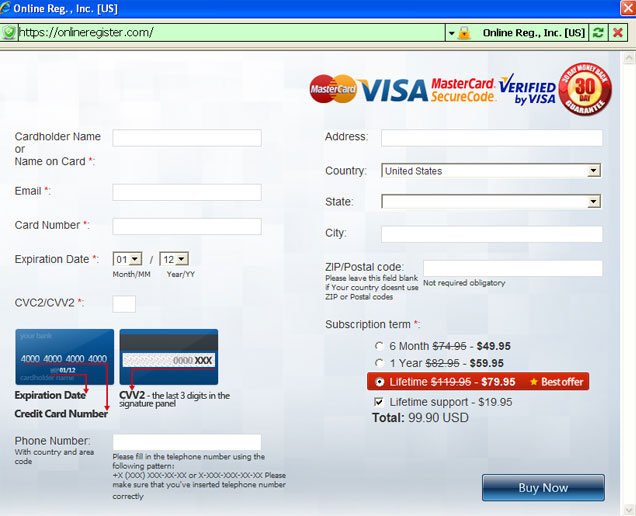
Fake payment page. Even though, it says onlineregister.com, this fake payment page is loaded from completely different location. And it's certainly not verified by Visa. 30 days money back guarantee? They just kidding.


It's surprising that after all this time, scammers haven't change they way their rogue program is registered. I mean they left the same pattern which makes it easy to generate a fake registration key. This means they probably cannot modify course code.

Anyway, if your computer got infected with this rogue antivirus program, please follow the removal instructions below. Good luck!


Windows Ultimate Safeguard removal using fake registration key:

To remove this malware using fake registration key, please follow this removal guide.


Windows Ultimate Safeguard removal using Safe Mode With Networking:

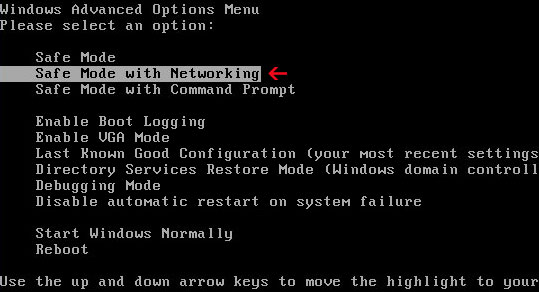
1. Reboot your computer is "Safe Mode with Networking". As the computer is booting tap the "F8 key" continuously which should bring up the "Windows Advanced Options Menu" as shown below. Use your arrow keys to move to "Safe Mode with Networking" and press Enter key.


NOTE: Login as the same user you were previously logged in with in the normal Windows mode.

2. Download recommended anti-malware software (Spyware Doctor) and run a full system scan to remove Windows Ultimate Safeguard and associated malware from your computer.

NOTE: don't forget to update anti-malware software before scanning your computer.


Removing Windows Ultimate Safeguard manually:

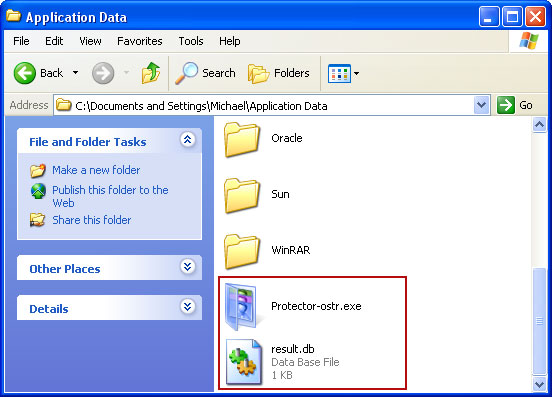
The main malicious files is located in your Application Data folder.

Windows XP: C:\Documents and Settings\[Current User]\Application Data
Windows Vista/7: C:\Users\[Current User]\AppData\Roaming

File name: Protector-ostr.exe


Simply rename Protector-ostr.exe to virus.ex of anything you like and reboot your computer. Windows Ultimate Safeguard won't show up anymore.

Download recommended anti-malware software (Spyware Doctor) and run a full system scan to remove Windows Ultimate Safeguard and associated malware from your computer.

Tell your friends:

Saturday, 28 July 2012

Remove Windows Ultra Antivirus (Uninstall Guide)

It's been a while since we've last seen a rogue security program from scareware families other that Fakevimes and Winwebsec. Ransomware applications have been roaming around the net for a while replacing (only partly) fake antivirus programs. Our guess is that ransomware scams became more profitable than rogue AVs. However, yesterday we stumbled upon a new rogue anti-virus program called Windows Ultra Antivirus which only proves that affiliate scareware networks are still active and not leaving anytime soon.


Windows Ultra-Antivirus is not a particularly nasty piece of malware. It's a typical fake antivirus program which claims that your computer is infected with viruses. Once installed, the rogue program pretends to scan your machine for malicious software. It randomly displays genuine Windows files and assigns assumed malware infections for each of those files. The rogue program rarely detects less then ten malware infections even on a perfectly clean computer with freshly installed Windows on it.

Unlike most fake antivirus programs, Windows Ultra Antivirus provides short threat descriptions for all the infections found during the scan. Not sure why malware authors did that but again we can guess they are trying to drive more sales by adding some extra reliability to their useless software.

Win32/Exploit.CVE-2010-3333.0 threat description:


Win32/Agent.TMP threat description:


Windows Ultra Antivirus is promoted through the use of fake online virus scanners and Trojan horses that masquerade as a legitimate Microsoft updates. The rogue application is configured to run automatically when Windows starts. The most worrying part is a rookit infection which comes bundled with this fake antivirus program. The malicious randomly named .sys file is dropped in C:\WINDOWS\system32\drivers folder. The file is locked so you can’t remove it manually.


In our case, the rootkit was detected as Gen:Variant.Zusy.8505 by GData ((Engine A).

Startup properties:
HKLM\SYSTEM\ControlSet001\Services\52fb2397ad5bf9eb\

The Windows Ultra Antivirus itself was detected as Trojan.FakeAlert.CYD, BackDoor.Bulknet.713, and Trojan-Dropper!IK by three different antivirus engines.

Normally, in order to remove found malware, victims are asked to purchase rogue AV programs. Windows Ultra-Antivirus scam works the same way but the problem is that at least at the time we tested this scareware, the payment page was unavailable.

hxxp://www.zokaisoft.com/payments/buynow.php?vendorId=1


So, it’s either a sign of a poorly organized scareware attack or they have some serious problems with payment processing.

Zokaisoft.com was registered by Aleksandr Bakcheev from Russia just a few weeks ago. But the whois information is probably false. We don't think such person even exists, unless cyber criminals used stolen credit card and personal details to register this domain.

So, what to do if you got infected by this annoying malware? First and foremost, do not attempt to remove Windows Ultra Antivirus manually. If you don't remove all malware components, malware authors can do anything while on your computer including reading your key strokes and getting personal identification information. To remove this malware from your computer properly, please follow the removal instructions below. Comments and questions are welcome. Good luck!


Windows Ultra Antivirus removal instructions:

1. First of all, we need to remove the rootkit. Download TDSSKiller and save it on your desktop.

2. Double-click on it to start TDSSKiller. NOTE: sometimes, rootkits block this utility to avoid removal. If you can't run this utility, simply rename tdsskiller.exe to iexplore.exe and run it again.

3. Once started, TDSSKiller may display an error message stating that it Can't Load Driver. Don't worry about that, simply click OK to continue.


4. Click on the Start Scan button to begin scanning your computer for rootkits.


5. When the scan is over, the utility outputs a list of detected objects with description. You should see a locked service which is the actual rootkit we need to remove.

Choose to Delete this rootkit and click on the Continue to remove delete the rootkit.


6. A reboot might require after disinfection. Click on the Reboot computer button.


7. TDSSKiller will now reboot your computer, but instead going into normal Windows mode reboot your computer is "Safe Mode with Networking". As the computer is booting tap the "F8 key" continuously which should bring up the "Windows Advanced Options Menu" as shown below. Use your arrow keys to move to "Safe Mode with Networking" and press Enter key.


NOTE: Login as the same user you were previously logged in with in the normal Windows mode.

8. Download recommended anti-malware software (Spyware Doctor) and run a full system scan to remove this virus and associated malware from your computer.

NOTE: don't forget to update anti-malware software before scanning your computer.


Associated Windows Ultra Antivirus files and registry values:

Files:

Windows XP:
  • C:\Windows\System32\[SET OF RANDOM CHARACTERS].exe
  • C:\Windows\System32\drivers\[SET OF RANDOM CHARACTERS].sys
Registry values:
  • HHKEY_CURRENT_USER\Software\Microsoft\Windows\CurrentVersion\Run "[SET OF RANDOM CHARACTERS]"
Tell your friends:
Friday, 27 July 2012

SearchYa! Toolbar and Searchya.com (Uninstall Guide)

SearchYa! is a web search engine owned by Ironsource Ltd., based in Israel. There's also a browser toolbar with the same name SearchYa! toolbar. Both products come bundled with freeware and third-party applications. This software marketing strategy is very controversial, some experts say it should be unallowed while others think it's acceptable as long as EULA and opt-out options are presented in a very clear, concise, and easy to understand way. Maybe they are right, but what we know for sure, not all software developers follow these directions and sometimes they knowingly 'pushes' their software through silent installers and similar applications.


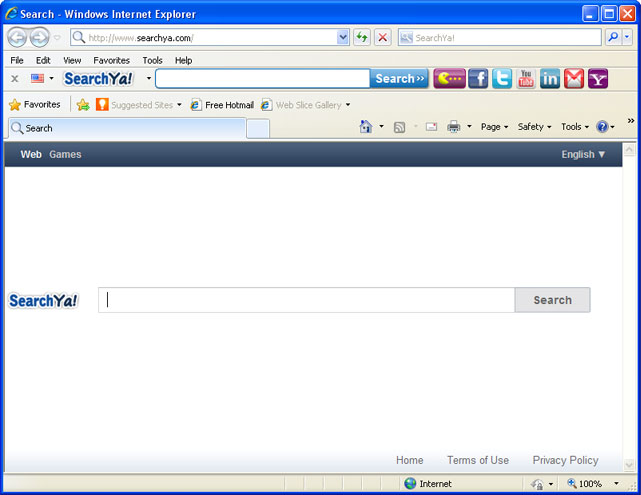
Speaking of SearchYa, it came bundled with a free FLV player application (both the toolbar and web search engine). Once installed, it changes default search engine in Internet Explorer and Mozilla Firefox. It changes home page as well (redirects to searchya.com). Searching directly from the address bar redirects to searchya.com too. That's why some people call it the searchya redirect virus. Google Chrome stays unaffected. The search results are surprisingly good but we suspect that they use Google custom search technology or something very similar to deliver quality search results. However, we don't know for sure.

SearchYa toolbar works in IE and Firefox. Chrome gets Speed Dial 4.0 extension instead of toolbar. So far, everything looks not bad, so where's the problem? The problem is that they do not have a properly working uninstaller. Users gave to remove web browser extensions and restore default settings manually. SearchYa Web Search removal might be specially difficult for Mozilla Firefox users.

To remove SearchYa web search and toolbar from your computer, please follow the removal instructions below. If you have any questions or valuable remarks, please leave a comment below. Good luck and be safe online!


SearchYa! toolbar and Web Search removal instructions:

1. First of all, download recommended anti-malware software and run a full system scan. It will detect and remove this infection from your computer. You may then follow the manual removal instructions below to remove the leftover traces of this browser hijacker. Hopefully you won't have to do that.


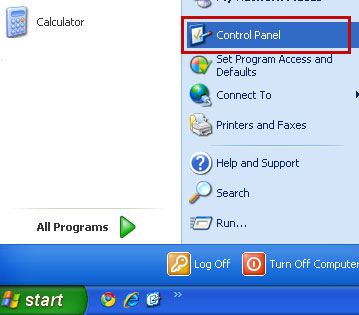
2. Go to the Start Menu. Select Control PanelAdd/Remove Programs.
If you are using Windows Vista or Windows 7, select Control PanelUninstall a Program.


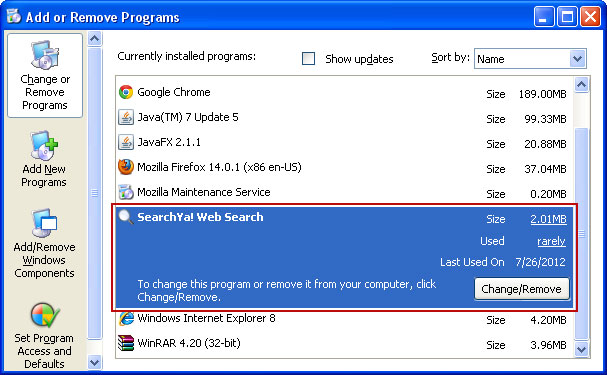
3. Search for SearchYa! Web Search in the list. Select the program and click Remove button.

If you are using Windows Vista/7, click Uninstall up near the top of that window.


Alternate removal: run C:\Program Files\SearchYa!\1.5.20.0*\uninstall

* This is the version of the toolbar you downloaded.


Remove SearchYa! in Internet Explorer:

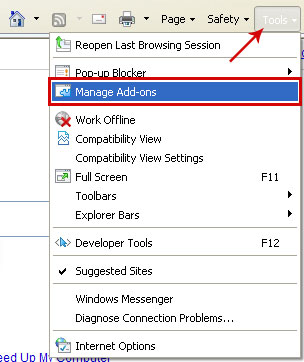
1. Open Internet Explorer. Go to ToolsManage Add-ons.


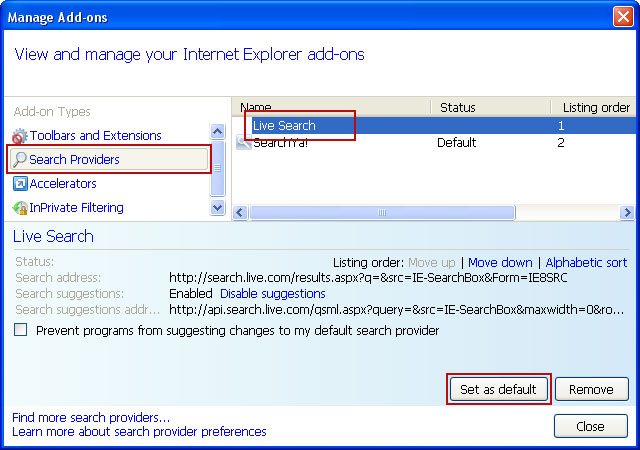
2. Select Search Providers. First of all, choose Bing or Live Search search engine and make it your default web search provider (Set as default).


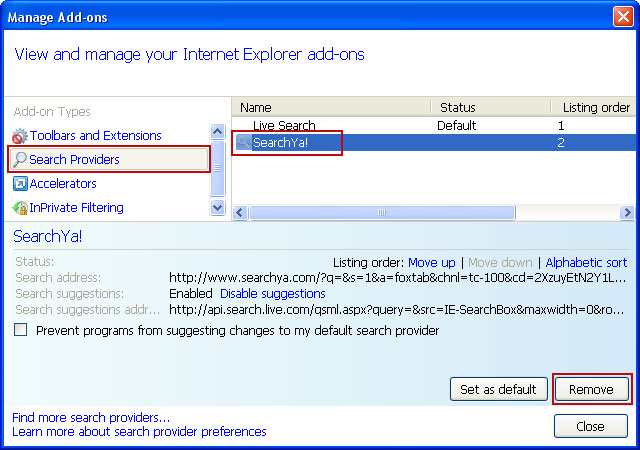
3. Remove SearchYa! web search providers. Close the window.


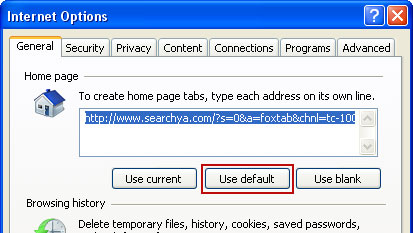
4. Go to ToolsInternet Options. Select General tab and click Use default button or enter your own website, e.g. google.com instead of http://www.searchya.com. Click OK to save the changes. And that's about it for Internet Explorer.


Remove SearchYa! in Mozilla Firefox:

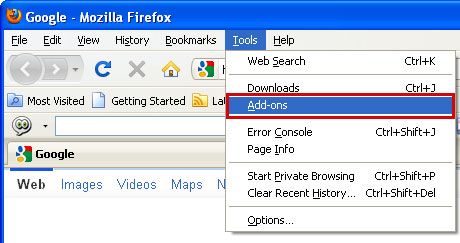
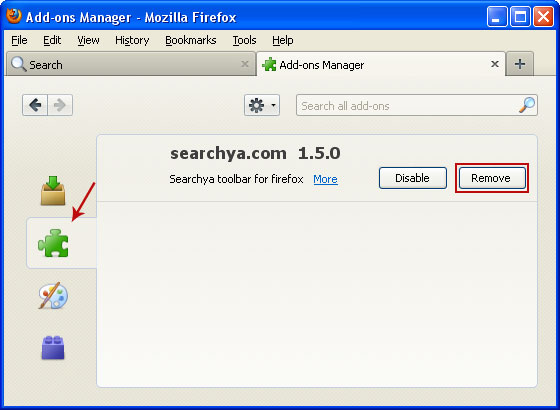
1. Open Mozilla Firefox. Go to ToolsAdd-ons.


2. Select Extensions. Remove searchya.com 1.5.0 toolbar. Close the window.


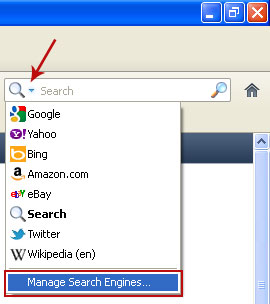
3. Click on the magnifying glass search icon as shown in the image below and select Manage Search Engines....


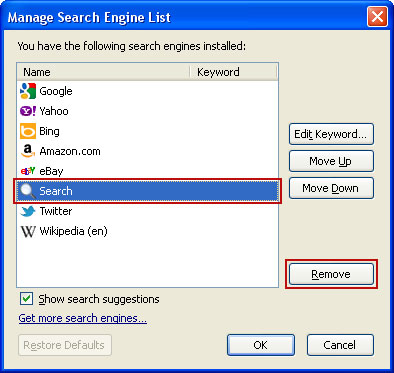
4. Choose Search from the list and click Remove to remove it. Click OK to save changes.


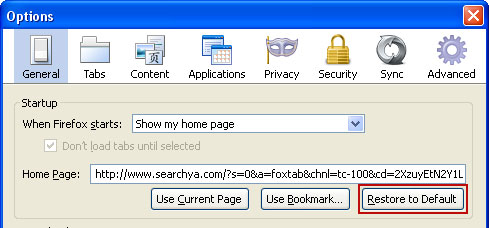
5. Go to ToolsOptions. Under the General tab reset the startup homepage or change it to google.com, etc.


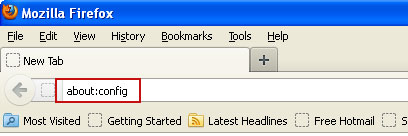
6. In the URL address bar, type about:config and hit Enter.


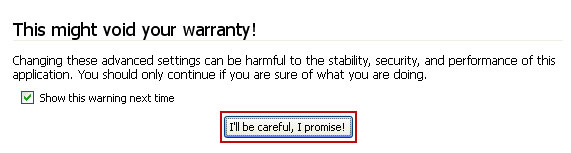
Click I'll be careful, I promise! to continue.


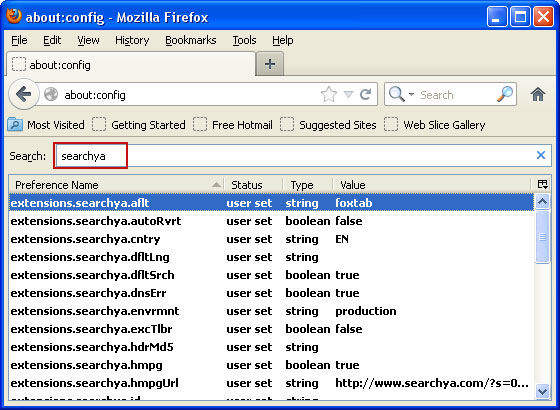
In the filter at the top, type: searchya


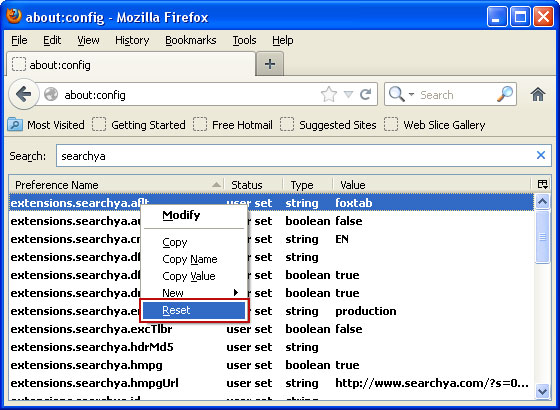
Now, you should see all the preferences that were changed by SearchYa!. Right-click on the preference and select Reset to restore default value. Reset all found preferences!


And that's it for Mozilla Firefox!


Remove Speed Dial 4.0 in Google Chrome:

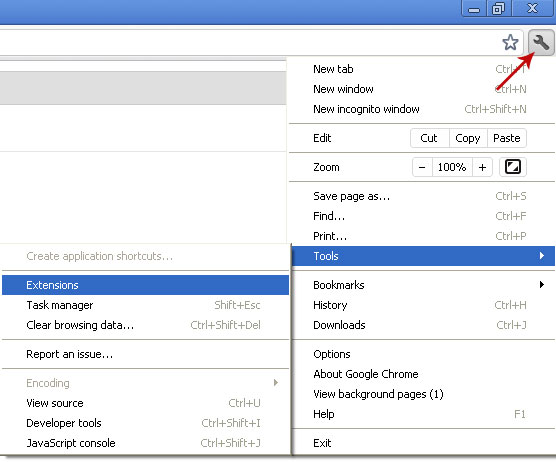
1. Click on Customize and control Google Chrome icon. Go to ToolsExtensions.


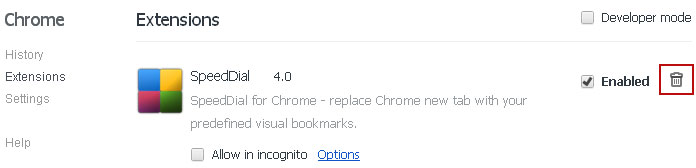
2. Select Speed Dial 4.0 and click on the small recycle bin icon to remove the toolbar.


Associated SearchYa! toolbar and Web Search files and registry values:

Files:
  • C:\Program Files\SearchYa!\1.5.20.0\escortShld.dll
  • C:\Program Files\SearchYa!\1.5.20.0\FavIcon
  • C:\Program Files\SearchYa!\1.5.20.0\searchyaApp.dll
  • C:\Program Files\SearchYa!\1.5.20.0\searchyaEng.dll
  • C:\Program Files\SearchYa!\1.5.20.0\searchyasrv
  • C:\Program Files\SearchYa!\1.5.20.0\searchyaTlbr.dll
  • C:\Program Files\SearchYa!\1.5.20.0\uninstall
  • C:\Program Files\SearchYa!\1.5.20.0\bh\searchya.dll
Registry values:
  • HKEY_CLASSES_ROOT\esrv.searchyaESrvc
  • HKEY_CLASSES_ROOT\esrv.searchyaESrvc\CurVer
  • HKEY_CLASSES_ROOT\ironsource.searchyaappCore
  • HKEY_CLASSES_ROOT\ironsource.searchyaHlpr
  • HKEY_CURRENT_USER\Software\Microsoft\Internet Explorer\Main "Start Page"
  • HKEY_LOCAL_MACHINE\SOFTWARE\Classes\esrv.searchyaESrvc
  • HKEY_LOCAL_MACHINE\SOFTWARE\Microsoft\Internet Explorer\Toolbar "SearchYa Toolbar"
  • HKEY_LOCAL_MACHINE\SOFTWARE\Microsoft\Windows\CurrentVersion\Uninstall\searchya
Tell your friends:
Boxore Adware (Uninstall Guide)

Today we came across another adware application called Boxore. It's distributed the old-fashioned way: people search for free online movie streaming sites where they could watch their favorite movies and TV shows without actually downloading them. Let's take The Dark Knight Rises as an example which stormed its way to the top of the US box office. There are many websites that allow you to watch this movie online and for free. Sounds good to be true? You betcha!

Most of the time, you either have to buy credits or download their "player" that is supposedly necessary to watch the movie. One of such streaming websites generated an error message claiming that we can't watch the movie because we don't have some fancy codecs installed on our machine. But that's not a problem, they immediately told us to download this free multimedia player called Player Plus which fixes everything right away. So, we did.

Surprisingly, the Player Plus setup wizard was in French even thought we were redirected from a video streaming site in English and the official download page was also in English. As you can see in the image below, we could choose not to install Boxore client and Babylon Toolbar but let's just say we were so excited or maybe inattentive and missed that option.


Everything went smoothly, we went back to the streaming site, clicked play button again and for our great disappointment we were able to watch The Dark Knight Rises trailer only, not the full movie. Darn scammers!

So, after all, we ended up with the Babylon toolbar and Boxore adware on our computer. You can read more about Babylon toolbar and Babylon search engine here. Now, let's have a look at Boxore client. There are two main components of this software: boxore.exe (client) and Update.exe (service). Both are set to start up automatically whenever you turn on your computer.

Going through boxore.exe file properties, comments section, quickly reveals what it's all about:
Get offers and recommendations matching with what you like (videos, games, music, ...)


The same information can be found at boxore.com. Furthermore, Boxore adware authors assure that their product is 100% safe, free and anonymous. It doesn't collect any information about the users. Boxore simply scans all the websites you visit searching for keywords that could help them determine what kind of topics you are interested in when browsing the net.

Boxore.exe sends ad requests regularly. If there's no ad available at that moment, it keeps monitoring your browsing habits. But we didn't have to wait very long for the first ad to show up. This advertisement (see the image below) was loaded after twenty or so minutes.


The ad came from openadserving.com. This website is currently ranking among 4000 most popular sites in the world. Even though, this data isn't very reliable we can still assume that Boxore network is serving ads to thousands of users each day.


And finally, one interesting fact about the multimedia player we downloaded: there are actually two versions of the Player Plus. If you download Player Plus from playerplus.com then you will get a clean version of this application. No toolbars, adware, etc. However, if you download Player Plus from a streaming site then you will get the evil version Player Plus X.


Last but but least, along with the Boxore adware came this Chrome extension called Smart Displat 1.1. We are not sure what it is, and we could find any information about this extension because it was removed from Chrome store. One way or another, this extension should be removed as well.

To remove Boxore adware and associated applications from your computer, please follow the removal instructions below. Good luck!

Source: http://deletemalware.blogspot.com


Boxore removal instructions:

1. First of all, download recommended anti-malware software and run a full system scan. It will detect and remove this infection from your computer. You may then follow the manual removal instructions below to remove the leftover traces of this browser hijacker. Hopefully you won't have to do that.


2. Go to the Start Menu. Select Control PanelAdd/Remove Programs.
If you are using Windows Vista or Windows 7, select Control PanelUninstall a Program.


3. Search for Boxore Client in the list. Select the program and click Remove button.

If you are using Windows Vista/7, click Uninstall up near the top of that window.


4. To remove Babylon toolbar and Babylon Search, please follow this removal guide.

5. Remove Smart Display 1.1 extension in Google Chrome.

 Click on Customize and control Google Chrome icon. Go to ToolsExtensions.


Select Smart Display 1.1 and click on the small recycle bin icon to remove the toolbar.


6. And finally, download recommended anti-malware software and run a full system scan to remove any associated malware or potentially unwanted applications from your computer.


Associated Boxore Adware files and registry values:

Files:
  • C:\Program Files\Boxore
  • C:\Program Files\Boxore\BoxoreClient
  • C:\Program Files\Boxore\BoxoreClient\boxore.exe
  • C:\Program Files\Boxore\BoxoreClient\COPYING
  • C:\Program Files\Boxore\BoxoreClient\index.dat
  • C:\Program Files\Boxore\BoxoreClient\rules.dat
  • C:\Program Files\Boxore\SmartDisplay\SmartExtensions\GoogleChrome\SmartDisplayExtension.crx
Registry values:
  • HKEY_LOCAL_MACHINE\SOFTWARE\Boxore
  • HKEY_LOCAL_MACHINE\SOFTWARE\Boxore\BoxoreClient
  • HKEY_LOCAL_MACHINE\SOFTWARE\Google\Chrome\Extensions\jeaihkehdlhkocphopopahkfjcfcphef
  • HKEY_LOCAL_MACHINE\SOFTWARE\Microsoft\Windows\CurrentVersion\Run "Boxore Client"
Tell your friends: