Monday, 30 April 2012

Backdoor.Multi.Zaccess.gen Removal Instructions

Every once in awhile we receive emails from our readers asking for technical help or assistance in resolving computer problems caused by all sorts of malicious software, not just spyware or Trojans. Some issues require research and cannot be resolved easily. Usually we need to find a threat-specific removal utility or routine to completely remove found malware. Unfortunately, it may not work for the masses of our readers even if we believe that they have the same problem. That's why we usually respond via email. However, this time we decide to bring up this topic about quite widely used malware called Backdoor.Multi.Zaccess.gen. We thought we would explain further what it does and how to remove it from your computer.

Ok, so first let's find out what does Backdoor.Multi.Zaccess.gen actually mean? All security vendors have their malware naming standards. Well, honestly they are pretty much the same for all AV's and basically derive from the Computer Antivirus Research Organization malware naming scheme. Backdoor is a type of infection. In this case, it's a piece of malware that provides attackers with control of infected computer while attempting to remain undetected. Multi stands for cross platform. It means this malware is capable of infecting Windows and Linux or Windows and Mac OS. Zaccess is a family name. Sometimes, different security vendors use the same family names to identify closely related malware threats. But of course they can use completely different names for the same threat. For example, Microsoft identifies this threat as Sirefef whereas Kaspersky names it Zaccess (ZeroAccess). And finally, gen is an additional suffix and it basically means that malware was detected using a generic signature. Let's sum things up: Backdoor.Multi.Zaccess.gen is a proactive defense detection for suspicious behavior. We know it sounds complicated :)

How do you get infected with Backdoor.Multi.Zaccess.gen?

Cyber crooks use exploit packs to target un-patched machines. Many PC users still don't know how to update their software. Critical Windows updates are installed automatically, but that's not enough, you need to update Java, Flash and other popular software as well. Decent antivirus software is a must! In case you didn't know, you can get infected by malware just by visiting a website. You don't even need to download or install anything. Web browsers are very well-written and complex pieces of software but they still have flaws that can be utilized to run malicious software. Backdoor.Multi.Zaccess.gen infection can be also distributed through spam and using various social engineering tricks. Just like any other malicious software really.

Once installed, Backdoor.Multi.Zaccess.gen creates multiple instances of Internet Explorer (iexplore.exe). Duplicate entries can be easily seen in Task Manager. Please note that there are no visible Internet Explorer windows but the multiple instances of iexplore.exe are still running in the background.


We registered many successful attempts to establish connection with remove hosts. Internet Explorer was downloading advertisements from remote servers for some strange reasons. It might be an interesting malicious traffic monetization scheme. We will make a more thorough analysis later but it's certainly the only possible payload of this malware.


What is more, Backdoor.Multi.Zaccess.gen blocks legitimate anti-virus software and malware removal tools. It simply doesn't allow you to scan the system. Sometimes you can't even install antivirus software on the infected computer. Thankfully, there are threat-specific malware removal utilities designed to bypass malware self protection mechanisms and remove the core files from the system. Any solution for Backdoor.Multi.Zaccess.gen? Sure thing. To remove this malware infection from your computer, please follow the removal instructions below. If you have any questions, please leave a comment. Safe surfing folks!

http://deletemalware.blogspot.com


Backdoor.Multi.Zaccess.gen removal instructions:

1. Download and execute TDSSKiller. Press the button Start scan for the utility to start scanning.


2. Wait for the scan and disinfection process to be over. Then click Continue. Please reboot your computer after the disinfection is over.


3. Download recommended anti-malware software (direct download) and run a full system scan to remove the remnants of this virus from your computer.


Associated Backdoor.Multi.Zaccess.gen files and registry values:

Files:
  • C:\Documents and Settings\All Users\Application Data\0Hh3oQ7q.exe
  • C:\WINDOWS\TEMP\qllmdq\setup.exe

Tell your friends:

Saturday, 28 April 2012

How to Remove Data Recovery (Uninstall Guide)

(Update: Saturday, April 28, 2012) Data Recovery is scareware masquerading as computer repair and optimization program. It pretends to scan your computer for hard drive, RAM and Windows registry errors and displays fake warnings. None of this is really surprising, or at least it shouldn't because it's a typical scareware. Cyber crooks behind Data Recovery just want to trick as many internet users as possible into paying for bogus computer repair program. This scareware is usually installed by the user when visiting infected/malicious websites or opening infected attachments. Malware authors use social engineering and drive-by downloads to distribute this malicious software too. Once installed, you may be requested to pay to fix supposedly detected critical hard drive errors and RAM failures. Just ignore those fake warnings and notifications about non-existent problems and uninstall Data Recovery from your computer. Of course, it's easier said than done, so to remove this malware from your computer, please follow the removal instructions below.

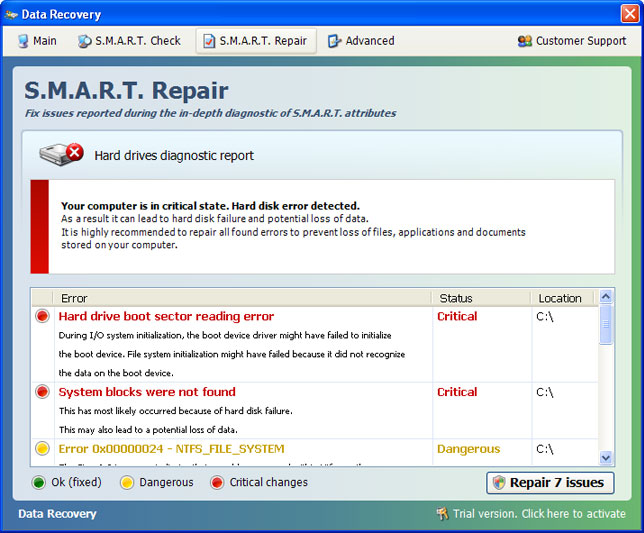
Data Recovery 2012 GUI:


Old GUI:
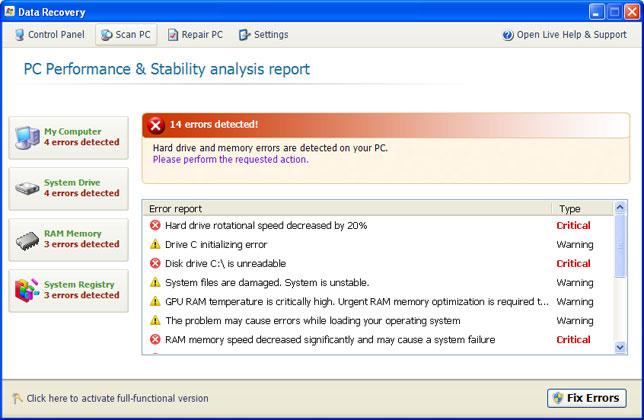

When running, Data Recovery will report the following problems on your computer:
  • Hard drive rotational speed decreased by 20%
  • Drive C initializing error
  • Disk drive C:\ is unreadable
  • System files are damaged. System is unstable
  • GPU RAM temperature is critically high
  • The problem may cause errors while loading your operating system
  • RAM memory speed decreased significantly and may cause a system failure
  • and many more...
It detects 14 errors on each infected computer. It doesn't matter whether is a brand new PC or and old laptop. All the errors and warnings are predetermined, so don't get spooked. Data Recovery is more annoying than dangerous, however, there's one this that shouldn't be overlooked. The rogue program hides certain files, usually shortcuts and Desktop icons, and moves other files to Windows %Temp%\smtmp folder.
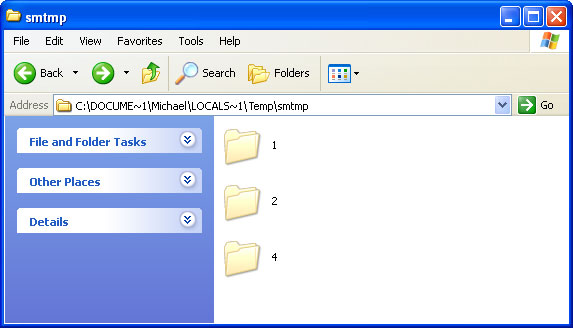


Do not delete any files from your Temp folder; otherwise you'll have to use Windows CD/DVD to restore your system. Thankfully, you can unhide your files rather easily. Just follow the removal instructions below. It is also worth mentioning that Data Recovery executable drops a rootkit from the TDSS family. If you don't remove the rookit the rogue application will be re-installed.

Fake Data Recovery warnings:
Windows detected a hard disk problem A potential disk failure may coss loss of files, applications and documents stored on the hard disk. Please try not to use this computer until the hard disk is fixed or replaced.

Critical Error RAM memory reliability is extremely low. This problem may cause system failure


Additionally, you can activate the rogue program by entering this registration code 15801587234612645205224631045976 08869246386344953972969146034087and any email as shown in the image below. Once this is done, you are free to install anti-malware software and remove the rogue anti-virus program from your computer properly.
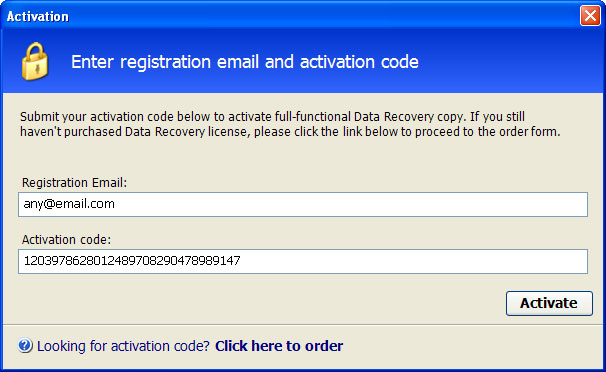


That's probably the most easiest way to remove Data Recovery malware: enter the code and then run a full system scan with recommended anti-malware software (direct download). You can also remove malicious files manually. One way or another, please follow the steps in the removal guide below. And of you have already purchased this bogus computer repair program, please contact your credit card company immediately and dispute the charges. Next time purchase software from reputable vendors only and keep it up to date. If you need help removing Data Recovery, please leave a comment below or email us. Good luck and be safe online!

Related malware:

Quick removal:

1. Use debugged registration key and fake email to register Data Recovery malware. This will allow you to download and run any malware removal tool you like and restore hidden files and shortcuts. Choose to activate "Data Recovery" manually and enter the following email and activation code:

mail@mail.com
08869246386344953972969146034087 (new code!)

mail@mail.com
1203978628012489708290478989147 (old code, may not work anymore)


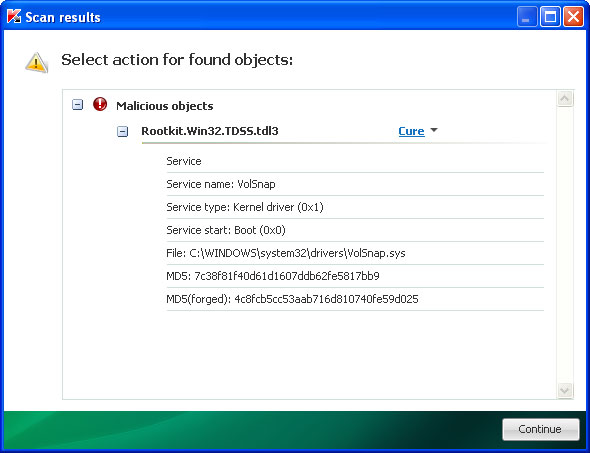
2. Download TDSSKiller and run a system scan. Remove found rootkits as shown in the image below. Reboot your computer if required.

3. Download recommended anti-malware software (direct download) and run a full system scan to remove this virus from your computer.


Alternate Data Recovery removal instructions:

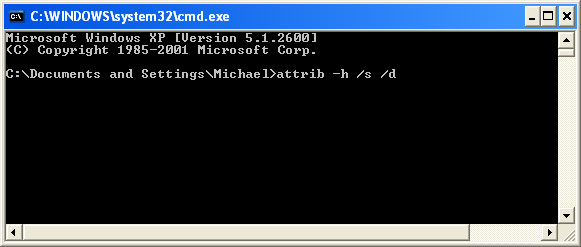
1. First of all, you need to unhide the files and folders. Select Run... from the Start Menu or just hit the key combination CTRL+R on your keyboard. In the Open: field, enter cmd and hit Enter or click OK.


At the command prompt, enter attrib -h /s /d and hit Enter. Now, you should see all your files and folders. NOTE: you may have to repeat this step because the malware may hide your files again.


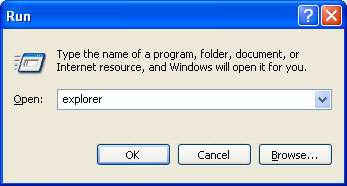
If you still can't see any of your files, Select Run... from the Start Menu or just hit the key combination CTRL+R on your keyboard. In the Open: field, enter explorer and hit Enter or click OK.


2. Open Internet Explorer. Select Run... from the Start Menu or just hit the key combination CTRL+R on your keyboard. In the Open: field, enter iexplore.exe and hit Enter or click OK.

Open Internet Explorer and download TDSSKiller or Backdoor.Tidserv Removal Tool. This malware usually (but not always) comes bundled with TDSS rootkit. Removing this rootkit from your computer is very important (if exists). Run TDSSKiller or Backdoor.Tidserv Removal Tool to remove the rootkit.


3. Finally, download recommended anti-malware software (direct download) to remove this virus from your computer.

NOTE: in some cases the rogue program may block anti-malware software. Before saving the selected program onto your computer, you may have to rename the installer to iexplore.exe or winlogon.exe With all of these tools, if running Windows 7 or Vista they MUST be run as administrator. Launch the program and follow the prompts. Don't forget to update the installed program before scanning.


Alertane Data Recovery removal instructions:

1. First of all, you need to unhide the files and folders. Select Run... from the Start Menu or just hit the key combination CTRL+R on your keyboard. In the Open: field, enter cmd and hit Enter or click OK.


At the command prompt, enter attrib -h /s /d and hit Enter. Now, you should see all your files and folders. NOTE: you may have to repeat this step because the malware may hide your files again.


2. The rogue application places an icon or your desktop. Right click on the icon, click Properties in the drop-down menu, then click the Shortcut tab.


The location of the malware is in the Target box.


On computers running Windows XP, malware hides in:
C:\Documents and Settings\All Users\Application Data\

NOTE: by default, Application Data folder is hidden. Malware files are hidden as well. To see hidden files and folders, please read Show Hidden Files and Folders in Windows.

Under the Hidden files and folders section, click Show hidden files and folders, and remove the checkmark from the checkbox labeled:

- Hide extensions for known file types
- Hide protected operating system files

Click OK to save the changes. Now you will be able to see all files and folders in the Application Data directory.

On computers running Windows Vista/7, malware hides in:
C:\ProgramData\

3. Look for suspect ".exe" files in the given directories depending on the Windows version you have.

Example Windows XP:
C:\Documents and Settings\All Users\Application Data\6DSS92c31Apgjk.exe
C:\Documents and Settings\All Users\Application Data\ixgPHgbBMPf.exe

Example Windows Vista/7:
C:\ProgramData\6DSS92c31Apgjk.exe
C:\ProgramData\ixgPHgbBMPf.exe

Basically, there will be a couple of ".exe" file named with a series of numbers or letters.
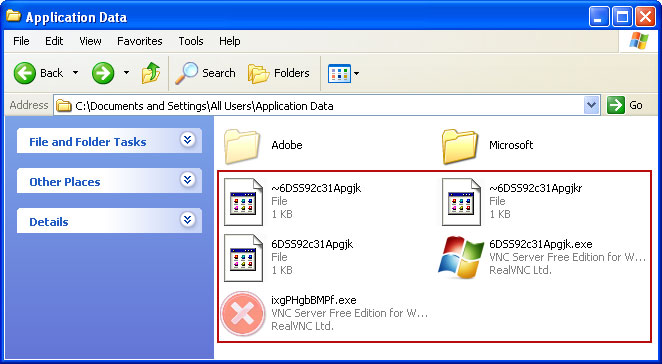


Rename those files to 6DSS92c31Apgjk.vir, ixgPHgbBMPf.vir etc. For example:
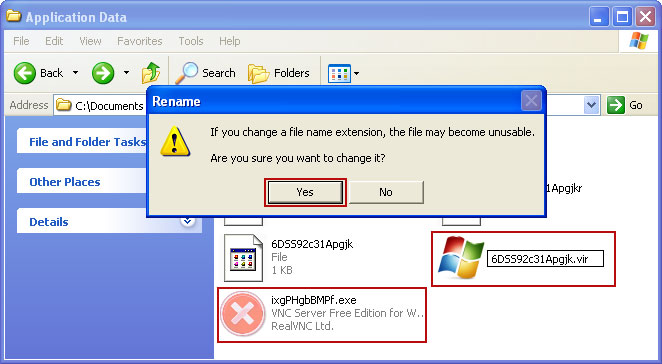


It should be: C:\Documents and Settings\All Users\Application Data\6DSS92c31Apgjk.vir

Instead of: C:\Documents and Settings\All Users\Application Data\6DSS92c31Apgjk.exe

4. Restart your computer. The malware should be inactive after the restart.

5. Open Internet Explorer and download TDSSKiller or Backdoor.Tidserv Removal Tool. This malware usually (but not always) comes bundled with TDSS rootkit. Removing this rootkit from your computer is very important (if exists). Run TDSSKiller and remove the rootkit.


6. Download recommended anti-malware software (direct download) to remove this virus from your computer

NOTE: in some cases the rogue program may block anti-malware software. Before saving the selected program onto your computer, you may have to rename the installer to iexplore.exe or winlogon.exe With all of these tools, if running Windows 7 or Vista they MUST be run as administrator. Launch the program and follow the prompts. Don't forget to update the installed program before scanning.


Associated Data Recovery files and registry values:

Files:

Windows XP:
  • %AllUsersProfile%\Application Data\[SET OF RANDOM CHARACTERS]
  • %AllUsersProfile%\Application Data\[SET OF RANDOM CHARACTERS].exe
  • %UsersProfile%\Desktop\Data Recovery.lnk
  • %UsersProfile%\Start Menu\Programs\Data Recovery\
  • %UsersProfile%\Start Menu\Programs\Data Recovery\Data Recovery.lnk
  • %UsersProfile%\Start Menu\Programs\Data Recovery\Uninstall Data Recovery.lnk
%AllUsersProfile% refers to: C:\Documents and Settings\All Users
%UserProfile% refers to: C:\Documents and Settings\[User Name]

Windows Vista/7:
  • %AllUsersProfile%\[SET OF RANDOM CHARACTERS]
  • %AllUsersProfile%\[SET OF RANDOM CHARACTERS].exe
  • %UsersProfile%\Desktop\Data Recovery.lnk
  • %UsersProfile%\Start Menu\Programs\Data Recovery\
  • %UsersProfile%\Start Menu\Programs\Data Recovery\Data Recovery.lnk
  • %UsersProfile%\Start Menu\Programs\Data Recovery\Uninstall Data Recovery.lnk
%AllUsersProfile% refers to: C:\ProgramData
%UserProfile% refers to: C:\Users\[User Name]

Registry values:
  • HKEY_CURRENT_USER\Software\Microsoft\Windows\CurrentVersion\Run "[SET OF RANDOM CHARACTERS].exe"
  • HKEY_CURRENT_USER\Software\Microsoft\Windows\CurrentVersion\Run "[SET OF RANDOM CHARACTERS]"
  • HKEY_CURRENT_USER\Software\Microsoft\Windows\CurrentVersion\Policies\Associations "LowRiskFileTypes" = '/{hq:/s`s:/ogn:/uyu:/dyd:/c`u:/bnl:/ble:/sdf:/lrh:/iul:/iulm:/fhg:/clq:/kqf:/`wh:/lqf:/lqdf:/lnw:/lq2:/l2t:/v`w:/rbs:'
  • HKEY_CURRENT_USER\Software\Microsoft\Windows\CurrentVersion\Policies\Attachments "SaveZoneInformation" = '1'
  • HKEY_CURRENT_USER\Software\Microsoft\Internet Explorer\Download "CheckExeSignatures" = 'no'
  • HKEY_CURRENT_USER\Software\Microsoft\Internet Explorer\Main "Use FormSuggest" = 'yes'
Share this information with other people:

Wednesday, 18 April 2012

Remove Malware Belonging to The Family FakeVimes (Uninstall Guide)

FakeVimes is a family of rogue antivirus programs that pretends to scan your computer for malicious software and constantly generates fake security alerts claiming that you are infected. It reports fictitious infections and detects files that do not even exist on your computer as malicious or potentially dangerous. Then the rogue anti-virus program informs that you need to pay money to register the software in order to remove these non-existent threats. FakeVimes has been all over the web recently. We've seen some well executed attacks on social networks and popular forums that lead to rogue anti-virus programs that belongs to the FakeVimes family. Most of the time, scareware is distributed through the use of fake online virus scanners titled Windows Antivirus 2012 but of course there are other means of distribution as well. In fact, their most popular tactics "Your computer is infected - buy our superb antivirus programs" do not work so well anymore, so they apparently decided to diversify into other markets, spamming Twitter for example.

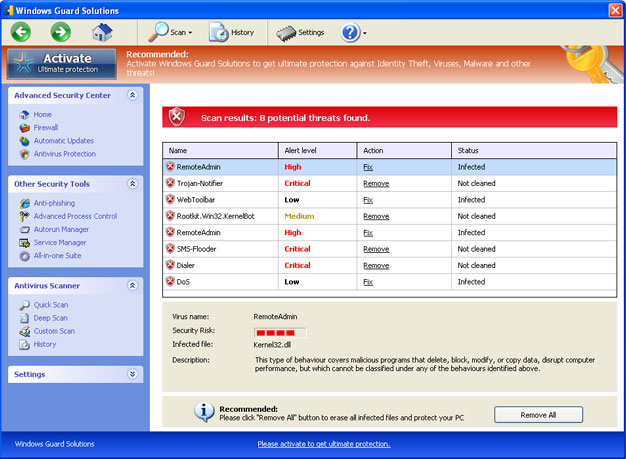
This is a typical FakeVimes GUI:


Cyber crooks who run FakeVimes malware campaigns change the name of their fake security product very often, almost every day. FakeVimes has been distributed with several different names when it first appeared on the web. The number of different names has been increasing steadily and now we have more than 80 different variants of FakeVimes scareware. However, the graphical users interface hasn't change much since it was released back in 2010.

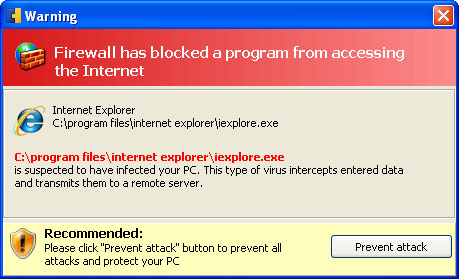
Fake security alerts are all the same as well. They didn't change much. Here's an example of what a typical fake security alert looks like:


Once installed, this fake security product alters Windows Hosts file to redirect search results, displays fake security warnings or dialog boxes and blocks certain apps on the infected computer, including most of the legitimate and well know antivirus programs. For this reason, some users may find it difficult to properly remove this scareware from infected computers. To remove rogue antivirus program belonging to the family FakeVimes, please follow the removal instructions below. Note, it doesn't matter how the rogue program calls itself. Windows Guard Solutions, Windows Safety Manager, etc. It doesn't matter, they are all the same. If you need  further assistance with this issue, please leave a comment below. Good luck and be safe online!


FakeVimes removal instructions:

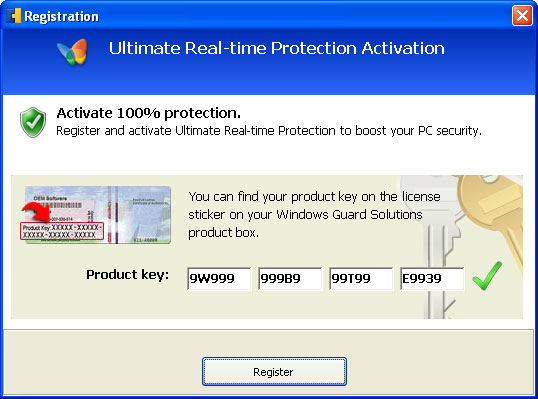
1. Click the question mark icon as show in the image below and select Activate Now.


2. Enter the following debugged registration key and click Register to register the rogue antivirus program. Don't worry, this is completely legal since it's not genuine software.

9W999-999B9-99T99-E9939


3. Download and run TDSSKiller. Wait for the scan and disinfection process to be over.

4. Download recommended anti-malware software (Spyware Doctor) and run a full system scan to remove FakeVimes scareware from your computer. That's it!

Tell your friends:

Tuesday, 17 April 2012

Remove Searchnu (Uninstall Guide)

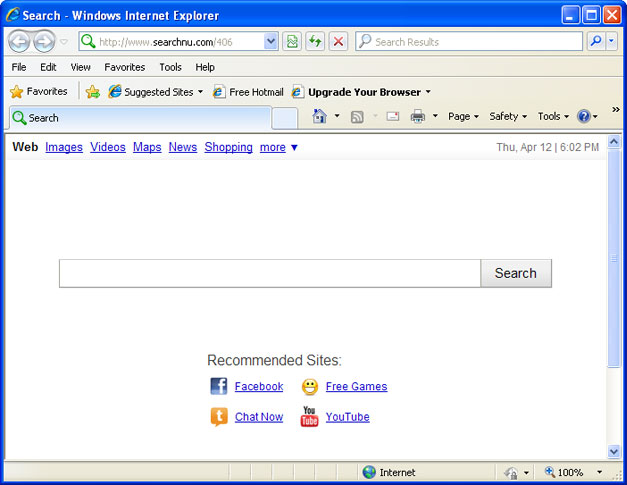
If your web browser starts with Searchnu rather than Google then you've probably installed some sort of freeware without fully reading software license agreement. By not fully reading software license agreements, you may be in danger of installing potentially dangerous software on your machine. Searchnu.com is just a website that looks pretty much like Google's search page except it has some advertisements below the search box and it redirects users to search-results.com.


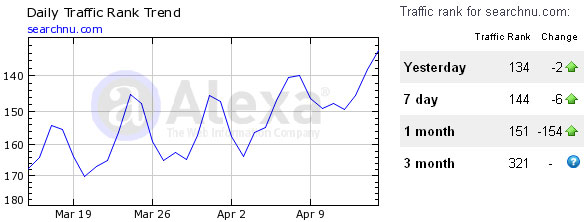
Both domains are owned by IAC Search & Media, Inc. (formerly Ask Jeeves, Inc.). This company owns some other popular domain names as well, for example Ask.com. Alexa traffic rank for this website is amazing. It's one of the most visited sites on the web, and for some reasons it's very popular in Africa. We have a feeling that this site will be in the Top100 most visited sites very soon.


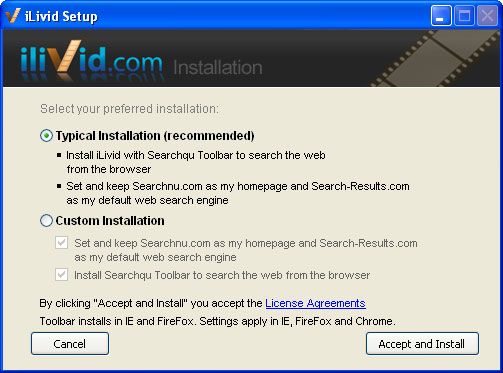
A quick search on Google shows searchnu to be a relatively widespread problem. This really isn't surprising considering the fact that searchnu.com home page and search-results.com web search engine provider are both promoted through the use of numerous very popular freeware, including Ilivid and some well known mp3 converters that are featured on Cnet. Very often, users use the typical installation option to install downloaded software. However, recommended installation is not always the preferred one. If you don't want to install certain components then simply select custom installation and choose what you truly want to install. And if you can't then look for alternatives. Let's take Ilivid setup as an example:


Typical installation includes Searchqu toolbar, searchnu.com and search-results.com. It sets and keeps searchnu as your default homepage and changes your default web search engine. This can be easily avoided by selecting custom installation. Let's assume that you got it with the Ilivid software (it might be any other software thought). Simply uninstalling this software won't help you to solve the burning issue. You need to uninstall every single installed component manually, including offending web browser add-ons and search engine providers. Searchnu indeed might be a bear to remove, especially in Mozilla Firefox. It changes the keyword.URL preference that cannot be changed directly from Firefox settings menu. No wonder why many users says it's a browser hijacker or even a virus. However, it's not a virus. It is detected as potentially dangerous program by Dr.Web only. Other antivirus software vendors do not detect it as dangerous and there's probably a good reason for that. So, don't blame your antivirus software for not detecting or isolating this "malware" because Searchnu.com is not a virus.

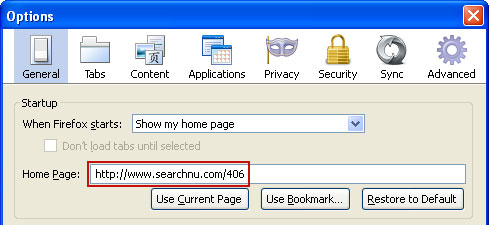
For step-by-step instructions on how to remove Searchnu (currently Searchnu.com/406) from your computer, please read the directions below. Please note, Searchnu settings apply in Internet Explorer, Mozilla Firefox and Google Chrome. If you need further assistance with this issue, please leave a comment below. Good luck and be safe online!

Added: Recent variants of Searchnu browser hijackers redirects users either to Searchnu.com/406 or Searchnu.com/421. I guess this is set using geo location tools, however, what's the difference between those two URLs isn't quite obvious. It is always best to read everything in the installation screens displayed by the software. This way, you can't miss the option where you can choose if you want toolbars or other junk or not. In addition, always read the Privacy Policy or UELA whenever installing a certain software. It may be tedious and time-consuming, especially if there is a wall of text with every page, but prevention is better than cure. Reading through each sentence is better than adding such clutter as Searchnu.com/421 to your browser.

If you have already accidentally installed toolbars or BHOs that you don't really want in the first place, regardless if you've done so consciously or not, you can still remove them. Unfortunately, not all software bundles with toolbars offer the option to uncheck these during installations.

http://deletemalware.blogspot.com


Searchqu Toolbar removal instructions:

1. First of all, download recommended anti-malware software and run a full system scan. It will detect and remove this infection from your computer. You may then follow the manual removal instructions below to remove the leftover traces of this browser hijacker. Hopefully you won't have to do that.


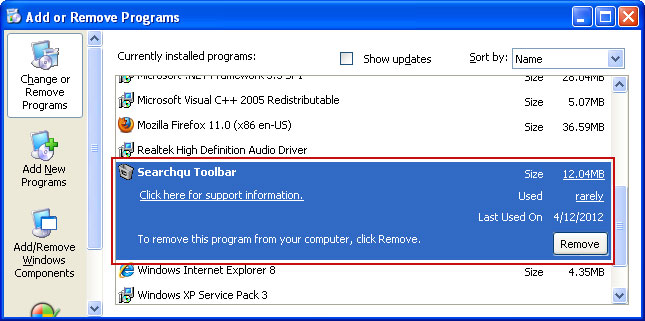
2. Go to the Start Menu. Select Control Panel → Add/Remove Programs.
If you are using Windows Vista or Windows 7, select Control Panel → Uninstall a Program.


3. Search for Searchqu Toolbar, iLivid and Search-Results toolbar in the list. Select the program(s) and click Remove button.
If you are using Windows Vista/7, click Uninstall up near the top of that window.


Remove Searchnu Toolbar in Internet Explorer:

1. Open Internet Explorer. Go to ToolsManage Add-ons.


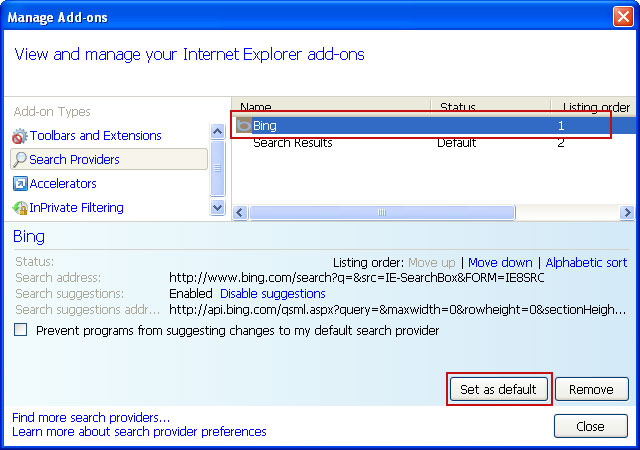
2. Select Search Providers. First of all, choose Bing search engine and make it your default web search provider (Set as default).


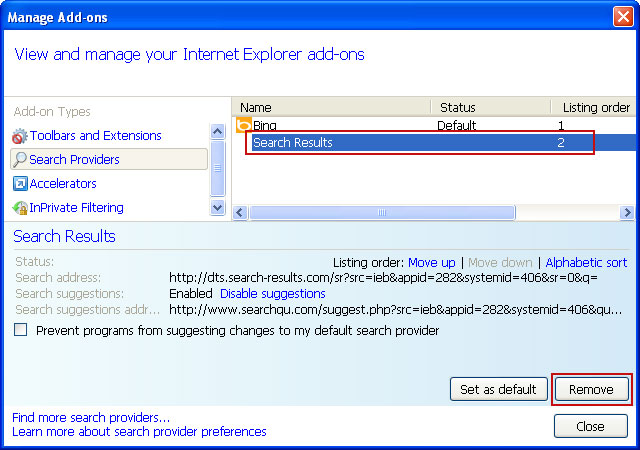
3. Then select Search Results and click Remove to remove it.


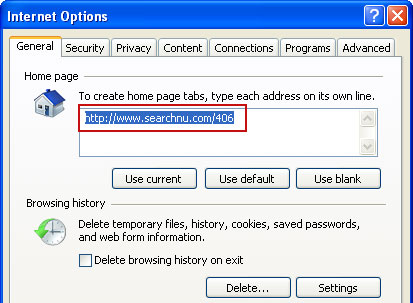
4. Go to ToolsInternet Options. Select General tab and click Use default button or enter your own website, e.g. google.com instead of searchnu.com/406. Click OK to save the changes. And that's about it.


Remove Searchnu in Mozilla Firefox:

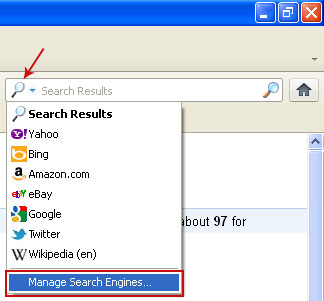
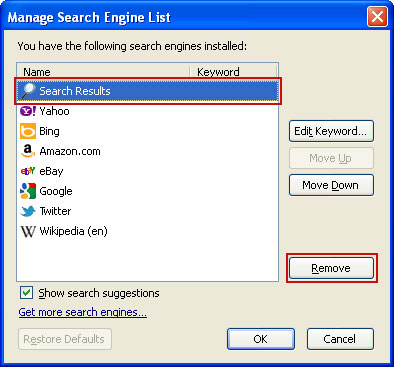
1. Open Mozilla Firefox. Click on the magnifying glass search icon as shown in the image below and select Manage Search Engines....


2. Choose Search Results from the list and click Remove to remove it. Click OK to save changes.


3. Go to ToolsOptions. Under the General tab reset the startup homepage or change it to google.com, etc.


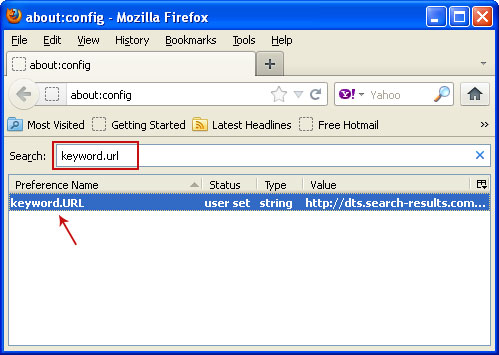
4. In the URL address bar, type about:config and hit Enter.


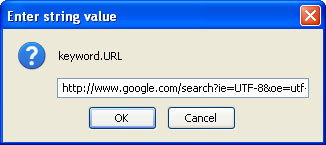
In the filter at the top, type: keyword.URL
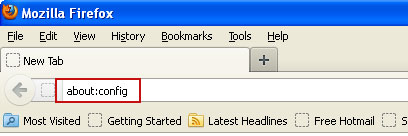


Double click keyword.URL. Delete search-results.com and replace it with http://www.google.com/search?ie=UTF-8&oe=utf-8&q=


Remove Searchnu in Google Chrome:
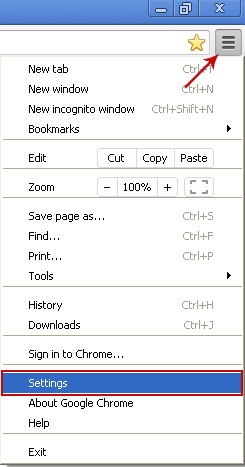
1. Click on Customize and control Google Chrome icon and select Settings.


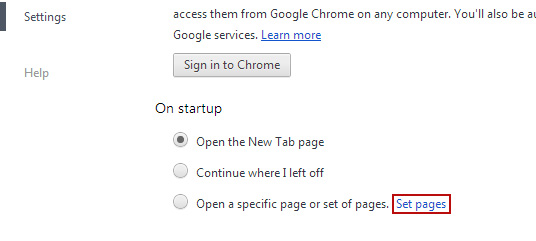
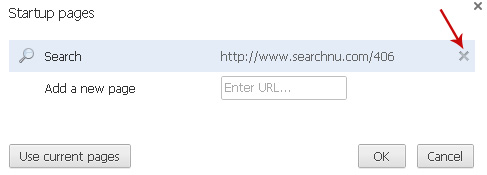
2. Click Set pages under the On startup.


Remove searchnu.com by clicking the "X" mark as shown in the image below.


3. Click Manage search engines button under Search.


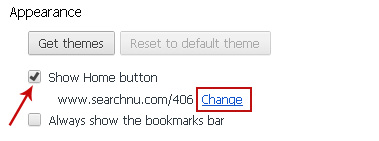
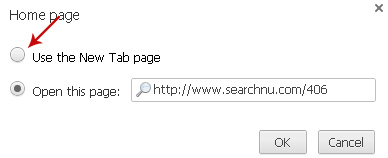
4. Click Show Home button under Appearance. Then click Change.


Select Use the New Tap page and click OK to save changes.


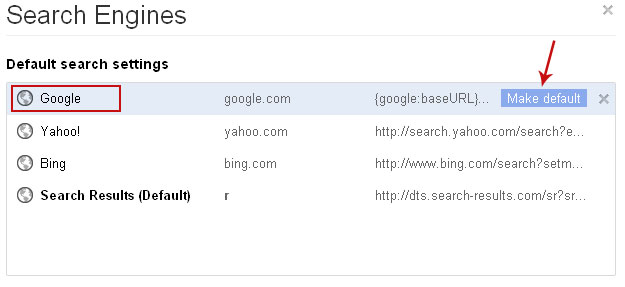
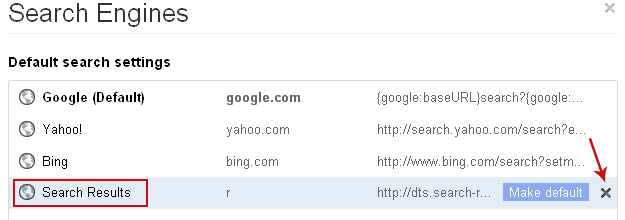
5. Select Google from the list and make it your default search engine.


6. Select Search Results from the list remove it by clicking the "X" mark as shown in the image below.


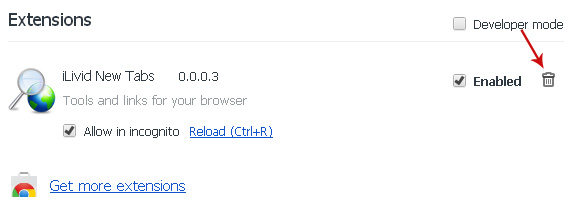
7. Click on Customize and control Google Chrome icon. Go to ToolsExtensions.

8. Select iLivid New Tabs and click on the small recycle bin icon to remove the extension.


Tell your friends: