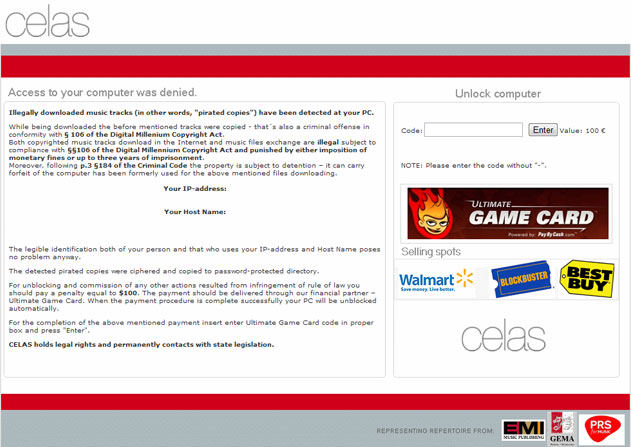
But things have started to change recently when cyber crooks released new variants of Reveton ransomware targeting U.S. and Canadian users. First, there was the FBI ransomware, then United States Department of Justice scams followed by other scams mimicking official notices from national police agencies in Canada. So, what we have now is the latest malware variant that mimics United States Cyber Security notice and frightens people into paying fines to avoid prosecution for supposedly downloaded and distributed pirated and illegal content. Needless to say that police authorities would rather knock at your front door rather than send you a warning asking to pay the fine via MoneyPak. Very often cyber crooks use strong language to scare victims into paying the fine, usually 100 or 200 bucks. It could be as low as $50 but we’ve never seen more than$200.

United States Cyber Security MoneyPak and related scams can be very successful. In fact, a ransom Trojan is very similar to a rogue antivirus program which similarly hijacks your computer and displays fake warnings until you pay the ransom or find a way to remove the malicious application. Don’t pay the fine because most certainly you won’t be able to get your money back. This scam does not rely on credit card payments from victims, there can’t be any chargebacks. Cyber crooks use alternative payment systems, mostly MoneyPak, Ukash and Paysafe. It’s rather easy to pay the fine via MoneyPak. MoneyPak cards are available for purchase at Wal-Mart, Kmart and other retailers. Victim maintains his anonymity but at the same time repeals any valid opportunity to get his money back. That’s an unenviable situation.
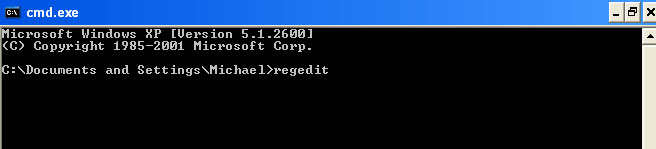
Manual United States Cyber Security ransomware removal is a risky and sometimes rather confusing process because it involves Windows registry editing and removing hidden or system protected files. Most users seek professional technical assistance. However, United States Cyber Security MoneyPak malware scam be removed manually and we will show you how. Please follow the removal instructions below.
There’s one more thing about this ransomware that you should be aware of - United States Cyber Security ransomware and other variants of Reveton malware are being distributed in conjunction with password stealing and banking Trojans, mostly Zeus Trojan. The most popular exploit kit used to plan malicious code on victim computers remains the same - Blackhole. Cyber criminals fine-tune exploit kits and payloads at the same time. For example, fake threatening messages are now being served from an encrypted connection and only when victim’s PC returns a special request. In such way, cyber crooks know their malware got infected the right person in targeted location who may pay the ransom and not the malware researcher’s PC who will quickly test malware and warn users about new threat. Recently, crooks started to exploit CVE-2012-4681 which is the latest Java vulnerability. Most likely this new vulnerability was discovered by Chinese. And it wasn’t even sold; someone leaked it saving at least $100.000 for cyber crooks who develop exploit packs. Obviously, they rushed to add this new exploit to all major exploit packs. As a result, infection rates almost doubled. They should consider themselves lucky. But not for long, Oracle made an announcement yesterday and introduced available patches for different versions of Java. So, hurry up, update Java!
OK, so now you know the basic information and schemes used by Reveton authors that are used to steal money form not so computer savvy users. When it comes to United States Cyber Security malware removal, there are at least two possible ways: manual removal and partly automated using a rescue disk. Manual removal may not be possible if you cannot reboot your computer in Safe Mode. Last, but not least, one your PC is clean, please change all your passwords and make sure they are strong enough. As we said, very often this ransomware comes bundled with spyware. Finally, to in order to eliminate the threat posed by the current version of this ransomware, you should run a full system scan with recommend anti-malware software.
If you have any further questions, please fell free to comment. If you want to share the removal method that worked for you, please do. Good luck and be safe online!
http://deletemalware.blogspot.com
Quick United States Cyber Security MoneyPak removal instructions (System Restore, may not work for all users):
1. Unplug your network cable and manually turn your computer off. Reboot your computer is Safe Mode with Command Prompt. As the computer is booting tap the F8 key continuously which should bring up the Windows Advanced Options Menu as shown below. Use your arrow keys to move to Safe Mode with Command Prompt and press Enter key.

2. Make sure you log in to an account with administrative privileges (login as admin).
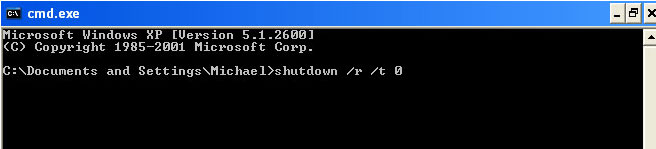
3. Once the Command Prompt appears you have few seconds to type in explorer and hit Enter. If you fail to do it within 2-3 seconds, the United States Cyber Security ransomware will take over and will not let you type anymore.
4. If you managed to bring up Windows Explorer you can now browse into:
- Win XP: C:\windows\system32\restore\rstrui.exe and press Enter
- Win Vista/Seven: C:\windows\system32\rstrui.exe and press Enter
6. Download recommended anti-malware software (Spyware Doctor) and run a full system scan to remove the remnants of United States Cyber Security ransomware.
United States Cyber Security ransomware removal using Kaspersky Rescue Disk:
1. Download the Kaspersky Rescue Disk iso image from the Kaspersky Lab server. (Direct download link)
Please note that this is a large downloaded, so please be patient while it downloads.
2. Record the Kaspersky Rescue Disk iso image to a CD/DVD. You can use any CD/DVD record software you like. If you don't have any, please download and install ImgBurn. Small download, great software. You won't regret it, we promise.
For demonstration purposes we will use ImgBurn.
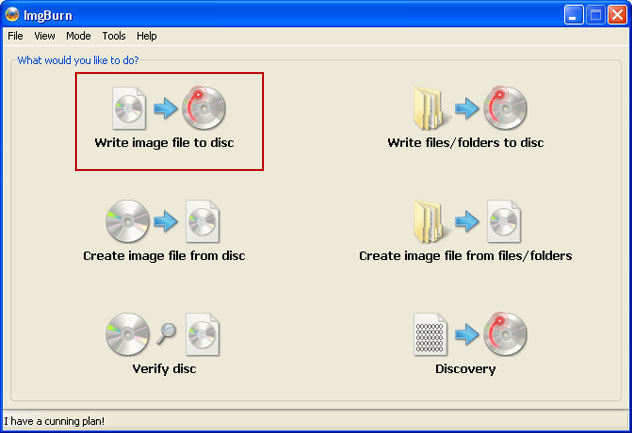
So, open up ImgBurn and choose Write image file to disc.
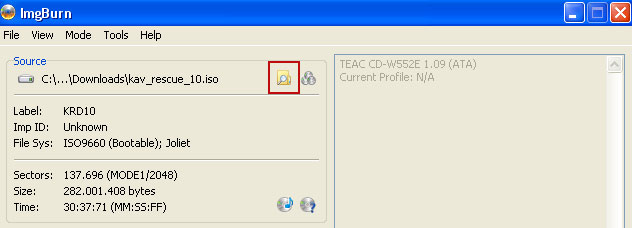
Click on the small Browse for file icon as show in the image. Browse into your download folder and select kav_rescue_10.iso as your source file.
OK, so know we are ready to burn the .iso file. Simply click the Write image file to disc button below and after a few minutes you will have a bootable Kaspersky Rescue Disk 10.

3. Configure your computer to boot from CD/DVD. Use the Delete or F2, F11 keys, to load the BIOS menu. Normally, the information how to enter the BIOS menu is displayed on the screen at the start of the OS boot.

The keys F1, F8, F10, F12 might be used for some motherboards, as well as the following key combinations:
- Ctrl+Esc
- Ctrl+Ins
- Ctrl+Alt
- Ctrl+Alt+Esc
- Ctrl+Alt+Enter
- Ctrl+Alt+Del
- Ctrl+Alt+Ins
- Ctrl+Alt+S
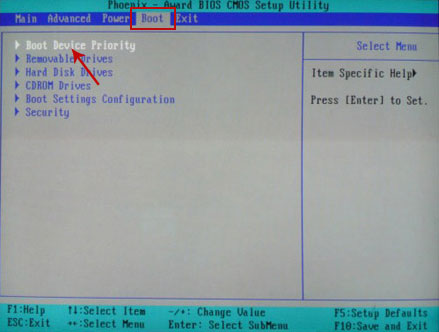
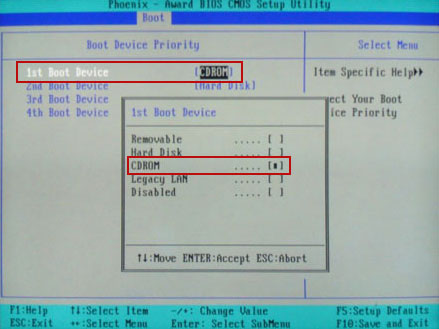
If you can't enter Boot Menu directly then simply use Delete key to enter BIOS menu. Select Boot from the main BIOS menu and then select Boot Device Priority.
Set CD/DVD-ROM as your 1st Boot Device. Save changes and exist BIOS menu.
4. Let's boot your computer from Kaspersky Rescue Disk.
Restart your computer. After restart, a message will appear on the screen: Press any key to enter the menu. So, press Enter or any other key to load the Kaspersky Rescue Disk.

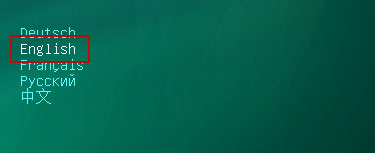
5. Select your language and press Enter to continue.
6. Press 1 to accept the End User License Agreement.

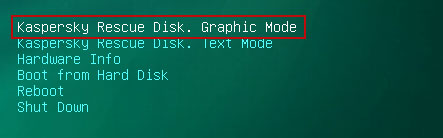
7. Select Kaspersky Rescue Disk. Graphic Mode as your startup method. Press Enter. Once the actions described above have been performed, the operating system starts.
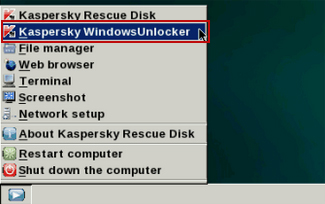
8. Click on the Start button located in the left bottom corner of the screen. Run Kaspersky WindowsUnlocker to remove Windows system and registry changes made by United States Cyber Security ransomware. It won't take very long.
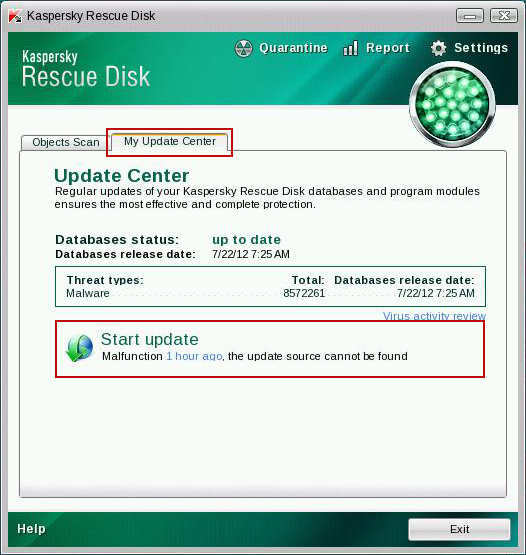
9. Click on the Start button once again and fire up the Kaspersky Rescue Disk utility. First, select My Update Center tab and press Start update to get the latest malware definitions. Don't worry if you can't download the updates. Just proceed to the next step.
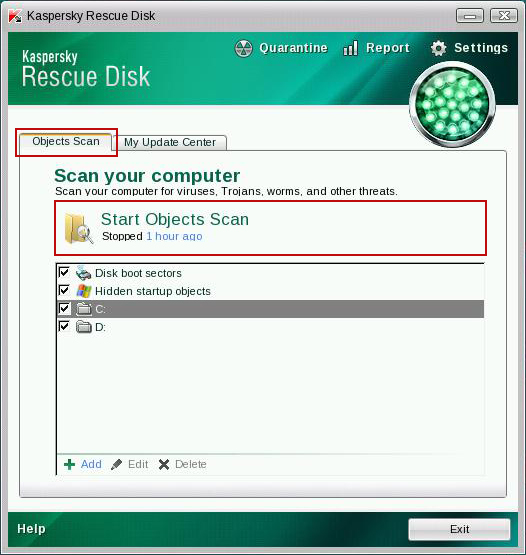
10. Select Object Scan tab. Place a check mark next to your local drive C:\. If you have two or more local drives make sure to check those as well. Then click Start Objects Scan to scan your computer for malicious software.
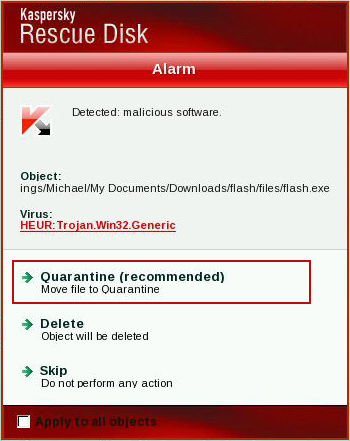
11. Quarantine (recommended) or delete every piece of malicious code detected during the system scan.
12. You can now close the Kaspersky Rescue Disk utility. Click on the Start button and select Restart computer.

13. Please restart your computer into the normal Windows mode. Download recommended anti-malware software (Spyware Doctor) and run a full system scan to remove the remnants of United States Cyber Security ransomware and spyware modules.
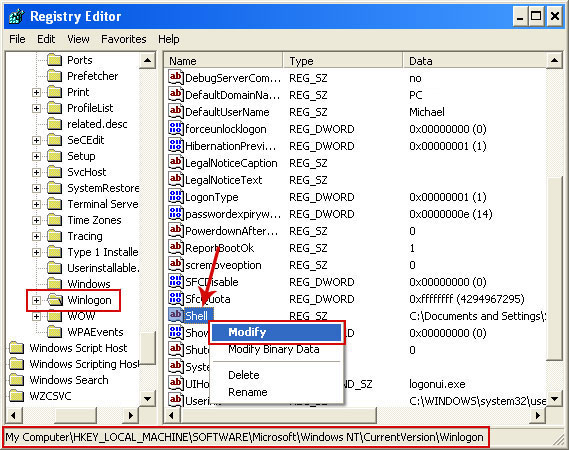
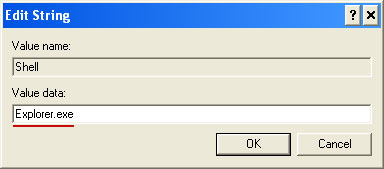
Associated United States Cyber Security ransomware files and registry values:
Files:
- [SET OF RANDOM CHARACTERS].exe
- HKEY_LOCAL_MACHINE\SOFTWARE\Microsoft\Windows NT\CurrentVersion\Winlogon\"Shell" = "[SET OF RANDOM CHARACTERS].exe"