Wednesday, 31 October 2012

Remove Search.certified-toolbar.com (Uninstall Guide)

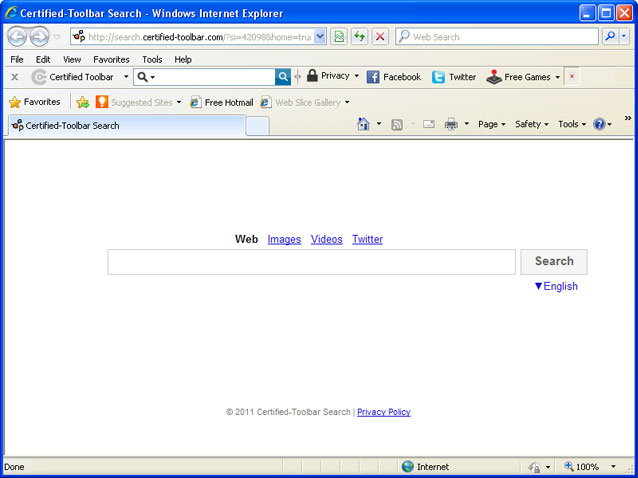
Search.certified-toolbar.com is the URL of a web search engine called Certified Toolbar, even though FAQ says it's Autocomplete Pro. So far, we've got at least several emails from our readers saying that this search engine is malicious. They couldn't find a way to remove this search engine completely from their PCs so I thought maybe there are more people out there trying to eliminate it, but without avail. Ok, so here's the deal: search.certified-toolbar.com isn't malicious. The toolbar itself isn't malicious either. It’s annoying, maybe.


Some people describe it as a web browser hijacker or even worse – redirect virus. Such accusations are patently untrue. At least I couldn't find any direct or indirect connections to malicious software or illegal activities. On the other hand, this web toolbar certainly collects some sort of information about the users who are using this service; otherwise it wouldn't make sense at all. Besides, I can't say I was impressed with the quality the search results provided by this search engine either. I have a feeling that they are using some sort of commercial tool that can be re-branded and used as a completely unique search engine.

Certified Toolbar and search.certified-toolbar.com can be removed at any time without any limitations, just like any other software installed on your computer. Sounds great, but that's not quite the case, I'm afraid. As well all know, browser add-ons and BHOs can be rather persistent. Even though, users can remove the toolbar rather easily, web browser modifications remain the same and they point to associated web sites. Very often, users have to restore default web browser settings manually. Usually: search page, default page URL, search bar, start page and keyword.URL in Mozilla Firefox. If you are being redirected to search.certified-toolbar.com, please follow the removal instructions below. Just a few simple steps and hopefully everything will be back to normal. Questions and comments are welcome and appreciated. Good luck and be safe online!


Search.certified-toolbar.com removal instructions:

1. First of all, download recommended anti-malware software and run a full system scan. It will detect and remove this infection from your computer. You may then follow the manual removal instructions below to remove the leftover traces of this browser hijacker. Hopefully you won't have to do that.


2. Go to the Start Menu. Select Control PanelAdd/Remove Programs.
If you are using Windows Vista or Windows 7, select Control PanelUninstall a Program.


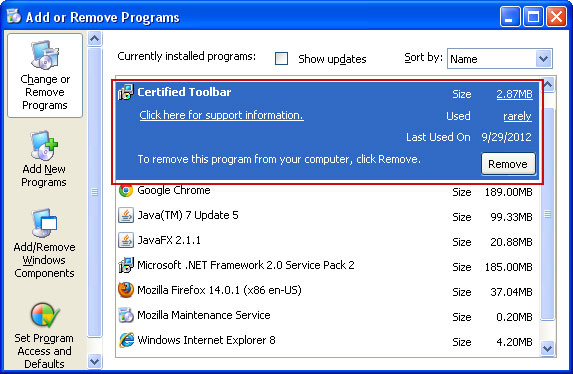
3. Search for Certified Toolbar and Protected Search applications in the list. Remove both applications. Please note, there might be only one of them, so don't worry if you can't find both.

If you are using Windows Vista/7, click Uninstall up near the top of that window.


Remove Search.certified-toolbar.com in Internet Explorer:

1. Open Internet Explorer. Go to ToolsManage Add-ons.


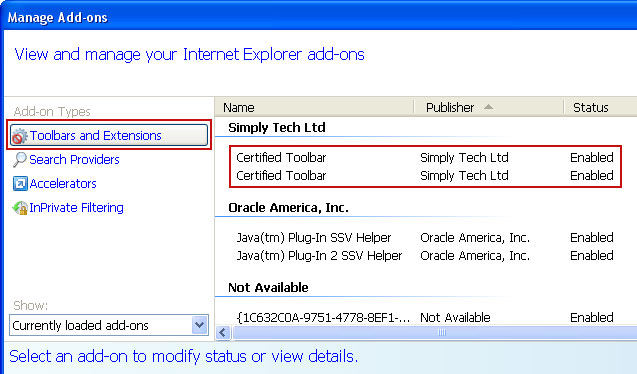
2. Select Toolbars and Extensions. Remove Certified Toolbar by Simply Tech Ltd. There might be two or more add-ons installed with the same name. Remove all of them.


3. Select Search Providers. First of all, choose Bing or Live Search search engine and make it your default web search provider (Set as default).
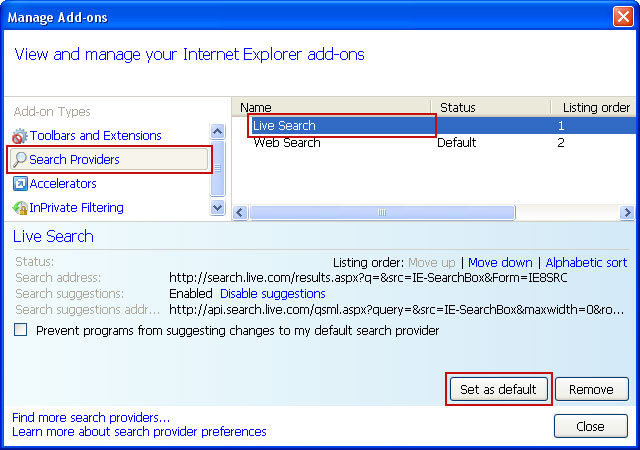


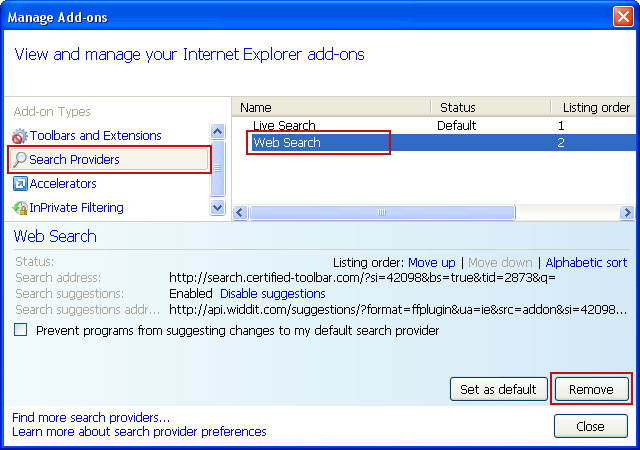
4. Remove Web Search web search provider. Close the window.


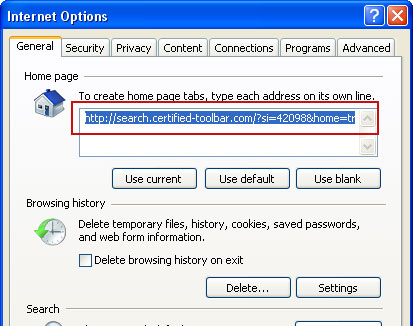
5. Go to ToolsInternet Options. Select General tab and click Use default button or enter your own website, e.g. google.com instead of http://search.certified-toolbar.com. Click OK to save the changes.


Remove Search.certified-toolbar.com in Mozilla Firefox:

1. Open Mozilla Firefox. Go to ToolsAdd-ons.


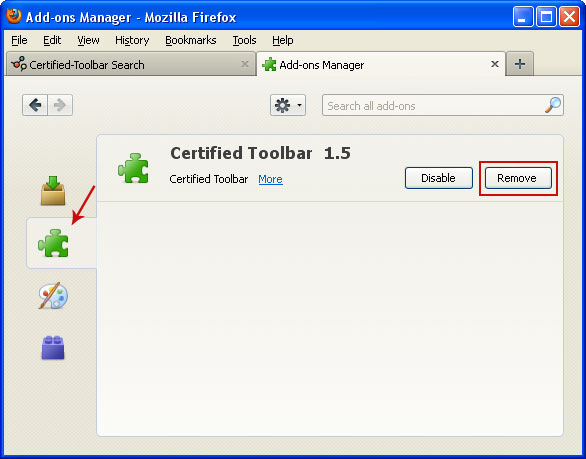
2. Select Extensions. Remove Certified Toolbar toolbar. Close the window.


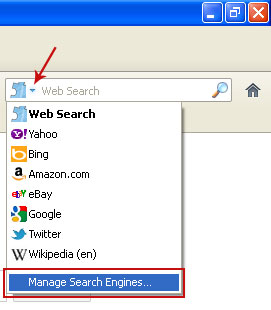
3. Click on the Web Search icon as shown in the image below and select Manage Search Engines....


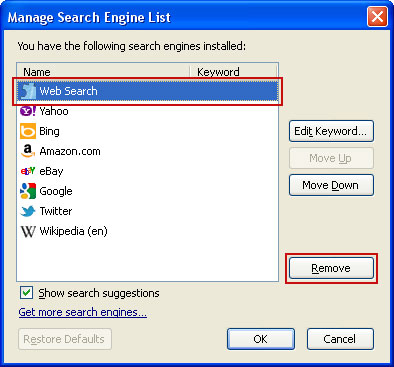
4. Choose Web Search from the list and click Remove to remove it. Click OK to save changes.


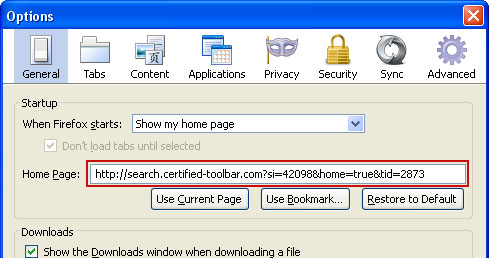
5. Go to ToolsOptions. Under the General tab reset the startup homepage or change it to google.com, etc.


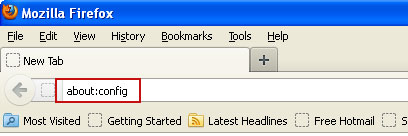
6. In the URL address bar, type about:config and hit Enter.


Click I'll be careful, I promise! to continue.


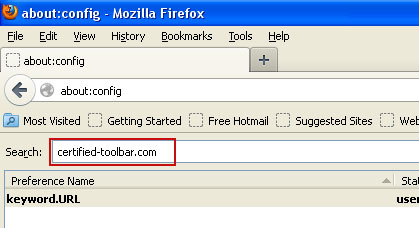
In the filter at the top, type: certified-toolbar.com


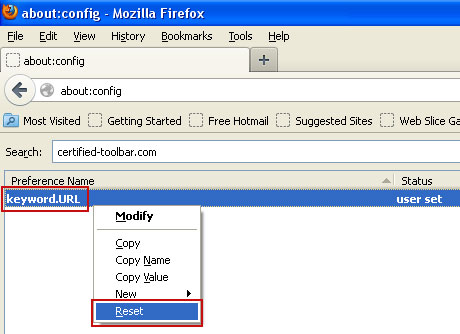
You should see all the preferences that were changed by Certified Toolbar Search. Right-click on the preference and select Reset to restore default value. Reset all found preferences!


Remove Search.certified-toolbar.com in Google Chrome:

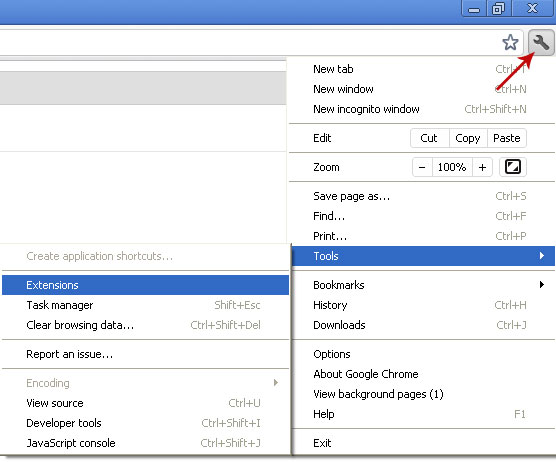
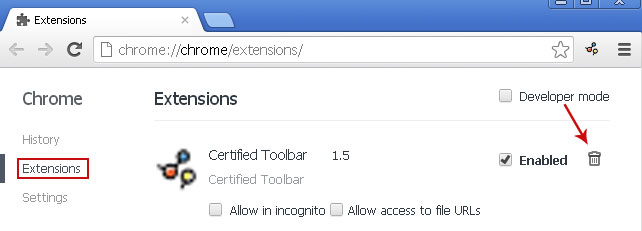
1. Click on Customize and control Google Chrome icon. Go to ToolsExtensions.


2. Select Certified Toolbar and click on the small recycle bin icon to remove the toolbar.


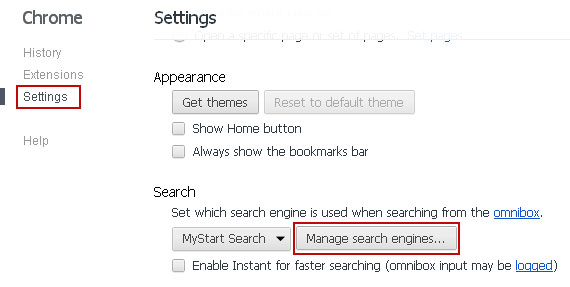
3. Click on Customize and control Google Chrome icon once again and now select Settings.


4. Click the Manage search engines...button under the Search settings


5. Select Google make it your default search engine.

6. Select Web Search from the list and remove it by clicking the "X" mark.

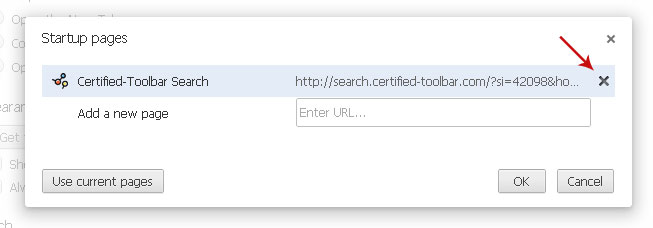
7. Under the On startup settings, select Open a specific page or set of pages and click Set Pages.


8. Select Certified-Toolbar Search from the list and remove it by clicking the "X" mark as shown in the image below


Tell your friends:

Saturday, 20 October 2012

"File Restore" Malware Removal

"File Restore" is a bogus disk cleaner and privacy protection tool. We've written about such fake repair tools before. However, only one was actively promoted, called File Recovery. It remains unclear whether this new malicious program will completely replace the previous one. It could be that cyber crooks will promote both programs at the same time hoping to generate more money. Well see.

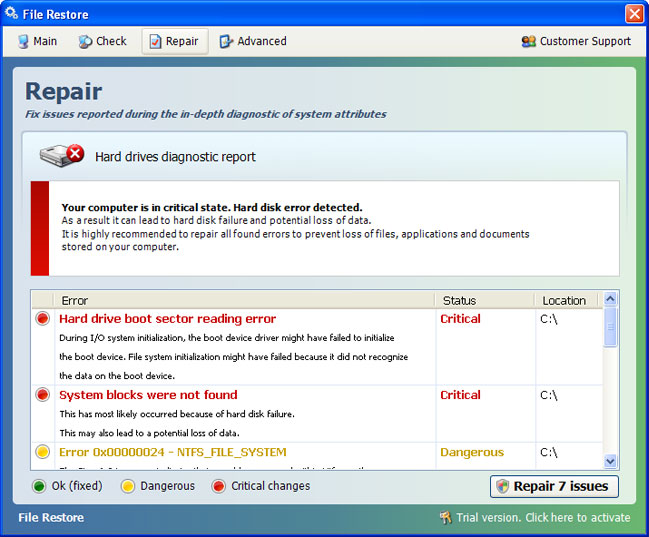
File Restore malware GUI


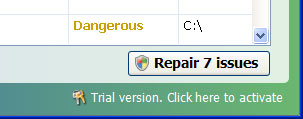
Suddenly appearing "Serious Disk Error" pop-ups and fake system notifications are the main symptoms of "File Restore" malware sales program infection. There are many variations of fake security alerts such as: "hard drive controller failure", "device initialization failed" and many more. Clicking on fake alerts opens up only the "File Restore" program which you obviously didn't install. The rogue repair tool has this amazingly fast auto-scan mode which detects and displays non-existent had drive reading errors, RAM failures and other supposedly critical system errors. After an auto-scan, "Repair 7 issues" opens up a convenient means to order a fix from this service or to "activate" the repair by purchasing the bogus program.

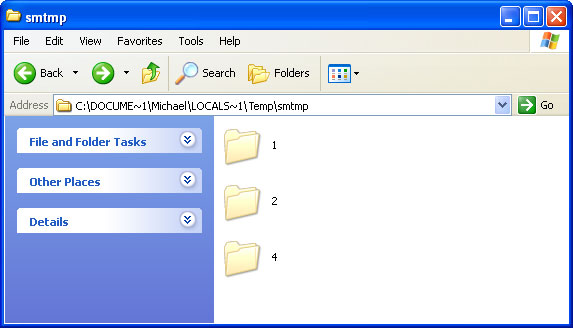
What is more, to motivate purchase, all icons and shortcuts have been wiped from the Start Menu, Desktop and from the list if most recently used programs. Now comes the important part, DO NOT delete files from your Temp folder or use any temp file cleaners. I know most of you guys use file cleaners to remove malware remnants and unnecessary files. But this time, DON'T! The rogue program moves certain fails to Windows Temp folder, specifically %Temp%\smtmp. Normally, you'll see something like this in your Temp folder. Note, that this folder is hidden.


So, even though, it now appears as if all your files are gone they are actually still there. It's just you can't see them. Deleting "File Restore" malware files manually won't solve the problem, because they are just the tip of an iceberg. You need to restore your files first and only then remove core elements of this malware using recommended anti-malware software. To remove this malicious software and restore your files safely, please follow the removal instructions below. If you have any further questions please let us know - we will be happy to assist you. Good luck and be safe online!


Quick "File Restore" malware removal:

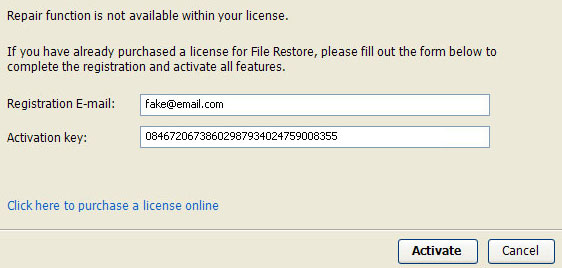
1. Use the activation key given below to register your copy of File Restore malware. This will allow you to download and run recommended malware removal software and automatically restore hidden files and shortcuts. Don't worry, you're not doing anything illegal and it won't make the situation worse. Select "Trial version. Click to activate" (at the bottom right hand corner of the fake scanner screen).


Use fake email and the following activation key:

Registration E-mail: fake@mail.com
Activation key: 08467206738602987934024759008355


2. Download TDSSKiller and run a system scan. Remove found rootkits (if any). Reboot your computer if required.

3. Download recommended anti-malware software (Spyware Doctor) and run a full system scan to remove this virus from your computer.


Alternate "File Restore" removal instructions:

1. First of all, you need to unhide the files and folders. Select Run... from the Start Menu or just hit the key combination CTRL+R on your keyboard. In the Open: field, enter cmd and hit Enter or click OK.


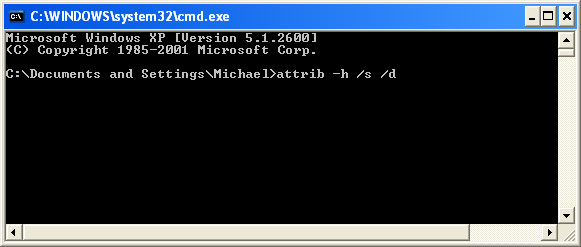
At the command prompt, enter attrib -h /s /d and hit Enter. Now, you should see all your files and folders. NOTE: you may have to repeat this step because the malware may hide your files again.


Open Internet Explorer. If the shortcut is hidden, pelase Select Run... from the Start Menu or just hit the key combination CTRL+R on your keyboard. In the Open: field, enter iexplore.exe and hit Enter or click OK.


2. Download and run this utility to restore missing icons and shortcuts.

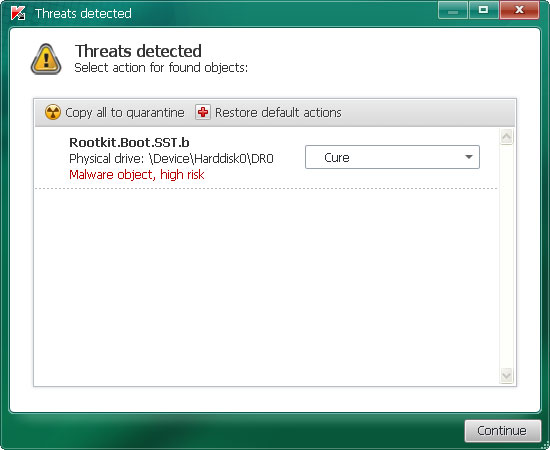
3. Now, please download TDSSKiller and run a system scan. Remove found rootkits as shown in the image below. Reboot your computer if required.


Please note that your computer might be rootkit free, not all version of "File Restore" comes bundled with rootkits. Don't worry if TDSSKiller didn't find a rootkit.

4. Finally, download recommended anti-malware software (Spyware Doctor) and run a full system scan to remove this malicious software from your computer.

NOTE: With all of these tools, if running Windows 7 or Vista they MUST be run as administrator. Launch the program and follow the prompts. Don't forget to update the installed program before scanning.

5. The malicious software should be gone now. If certain icons and shortcuts are still missing, please use restoresm.zip.


Associated "File Restore" files and registry values:

Files:

Windows XP:
  • %AllUsersProfile%\Application Data\[SET OF RANDOM CHARACTERS]
  • %AllUsersProfile%\Application Data\[SET OF RANDOM CHARACTERS].exe
  • %UsersProfile%\Desktop\File Restore.lnk
  • %UsersProfile%\Start Menu\Programs\File Restore\
  • %UsersProfile%\Start Menu\Programs\File Restore\File Restore.lnk
  • %UsersProfile%\Start Menu\Programs\File Restore\Uninstall File Restore.lnk
%AllUsersProfile% refers to: C:\Documents and Settings\All Users
%UserProfile% refers to: C:\Documents and Settings\[User Name]

Windows Vista/7:
  • %AllUsersProfile%\[SET OF RANDOM CHARACTERS]
  • %AllUsersProfile%\[SET OF RANDOM CHARACTERS].exe
  • %UsersProfile%\Desktop\File Restore.lnk
  • %UsersProfile%\Start Menu\Programs\File Restore\
  • %UsersProfile%\Start Menu\Programs\File Restore\File Restore.lnk
  • %UsersProfile%\Start Menu\Programs\File Restore\Uninstall File Restore.lnk
%AllUsersProfile% refers to: C:\ProgramData
%UserProfile% refers to: C:\Users\[User Name]

Registry values:
  • HKEY_CURRENT_USER\Software\Microsoft\Internet Explorer\Main "Use FormSuggest" = 'Yes'
  • HKEY_CURRENT_USER\Software\Microsoft\Internet Explorer\Main "Use FormSuggest" = "Yes"
  • HKEY_CURRENT_USER\Software\Microsoft\Windows\CurrentVersion\Internet Settings "CertificateRevocation" = '0'
  • HKEY_CURRENT_USER\Software\Microsoft\Windows\CurrentVersion\Internet Settings "WarnonBadCertRecving" = '0'
  • HKEY_CURRENT_USER\Software\Microsoft\Windows\CurrentVersion\Policies\ActiveDesktop "NoChangingWallPaper" = '1'
  • HKEY_CURRENT_USER\Software\Microsoft\Windows\CurrentVersion\Policies\Associations "LowRiskFileTypes" = '.zip;.rar;.nfo;.txt;.exe;.bat;.com;.cmd;.reg;.msi;.htm;.html;.gif;.bmp;.jpg;.avi;.mpg;.mpeg;.mov;.mp3;.m3u;.wav;.scr;'
  • HKEY_CURRENT_USER\Software\Microsoft\Windows\CurrentVersion\Policies\Attachments "SaveZoneInformation" = '1'
  • HKEY_CURRENT_USER\Software\Microsoft\Windows\CurrentVersion\Policies\Explorer "NoDesktop" = '1'
  • HKEY_CURRENT_USER\Software\Microsoft\Windows\CurrentVersion\Policies\System "DisableTaskMgr" = '1'
  • HKEY_CURRENT_USER\Software\Microsoft\Windows\CurrentVersion\Run "<random>.exe"
  • HKEY_CURRENT_USER\Software\Microsoft\Windows\CurrentVersion\Run "<random>"
  • HKEY_LOCAL_MACHINE\SOFTWARE\Microsoft\Windows\CurrentVersion\policies\system "DisableTaskMgr" = '1'
  • HKEY_CURRENT_USER\Software\Microsoft\Internet Explorer\Download "CheckExeSignatures" = 'no'
  • HKEY_CURRENT_USER\Software\Microsoft\Windows\CurrentVersion\Explorer\Advanced "Hidden" = '0'
  • HKEY_CURRENT_USER\Software\Microsoft\Windows\CurrentVersion\Explorer\Advanced "ShowSuperHidden" = '0'
Tell your friends:

Tuesday, 2 October 2012

Remove u-search.net (Uninstall Guide)

u-search.net is a tracking website that may log what your search for. It allows the authors of the website to know your interests, gather search terms, search volume and other information that could be valuable for ad networks, ad buyers, etc. Most people are not aware of u-search.net redirection because it loads very fast and then simply redirects to the corresponding Google page. It doesn't affect search results. Still, it's an invasion of privacy.

u-search.net comes bundled mostly with free software whether it would be a video converter or a file sharing application. For example, the latest version of Groovedown which is a file sharing application has included some modifications that change your web browser's default search engine to 'u-search.net'. It’s hardly malware but it definitely causes some privacy issues.


It doesn't install any Windows services or start-up entries. But it does modify certain Windows registry keys, SearchScopes for instance that specify Internet search providers. Furthermore, u-search.net creates and modifies certain configurations file for web browsers. It also changes your home page and makes it so that every time you open a new tab u-search.net shows up instead of Google or a blank page. That’s not the way it should be and it's definitely very annoying.

Fixes for Internet Explorer and Google Chrome are fairly simple. However, the fix for Mozilla Firefox is a bit trickier but still not too complicated. It's worth mentioning that uninstalling software that installed this browser hijacker rarely fixes redirection problems. You have to remove certain files and restore web browser's default settings manually. So, if your searches redirect through u-search.net, you should scan your computer with recommend anti-malware software and then follow the removal instructions below. If you have any further questions please let us know - we will be happy to assist you. Good luck and be safe online!

Source: http://deletemalware.blogspot.com


Scan your computer with recommended anti-malware and clean-up software:

First of all, download recommended anti-malware and clean-up software and run a full system scan to make sure that your computer is not infected with malicious or potentially unwanted applications and that your files are not corrupted before proceeding with the uninstall process.


Remove u-search.net in Internet Explorer:

1. Open Internet Explorer. Go to ToolsManage Add-ons.


2. Select Search Providers. First of all, choose Bing or Live Search search engine and make it your default web search provider (Set as default).


3. Remove u-Search web search provider. Close the window.


4. Go to ToolsInternet Options. Select General tab and click Use default button or enter your own website, e.g. google.com instead of http://u-search.net. Click OK to save the changes. And that's about it for Internet Explorer.


Remove u-search.net in Mozilla Firefox:

1. Navigate to the following folder:

%APPDATA%\Mozilla\Firefox\Profiles\

Simply copy/paste this line into 'Run' (open by pressing Win+R) then press Enter or click OK


Or copy/paste it into an Explorer Address Bar then press Enter


2. There should only be one folder (xxxxxxxx.default). Open that folder.

3. Look for a file called user.js. Simply delete the file. If you have persistent settings, you can open it with a text editor and remove the lines related to u-Search only.

4. Open Mozilla Firefox. In the URL address bar, type about:config and hit Enter.


Click I'll be careful, I promise! to continue.


In the filter at the top, type: u-search


Now, you should see all the preferences that were changed by u-Search. Right-click on the preference and select Reset to restore default value. Reset all found preferences!


5. Go to Tools → Options. Under the General tab reset the startup homepage or change it to google.com, etc.


6. Click on the magnifying glass search icon as shown in the image below and select Manage Search Engines....


4. Choose u-Search from the list and click Remove to remove it. Click OK to save changes.


That's it for Mozilla Firefox!


Remove u-search.net in Google Chrome:

1. Click on Customize and control Google Chrome icon once again and now select Settings.
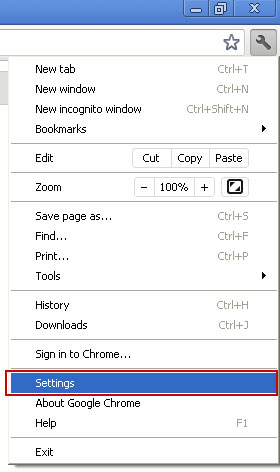


2. Under the heading Search, click Manage Search Engines


3. Mouse over  Google or any other search engine you like from the list and make it your default search engine.

4. Then mouse over u-Search, you will get a cross on the right hand side which will allow you to remove this search engine.

5. You may also want to check your homepage if you have one.

That's it!
    Tell your friends:

    Monday, 1 October 2012

    Remove XP Defender 2013 (Uninstall Guide)

    In order to remove XP Defender 2013 fake antivirus scanner we suggest you to run a full system scan with recommend anti-malware software. But there's one small problem: once installed, this virulent pieces of malware blocks legitimate anti-virus software, disables Task Manager and other system utilities and doesn't let you download other malware removal software. It simply blocks web browsers. When you run a web browser, the rogue antivirus program kills its process and launches malicious one instead. Fairly aggressive method used to protect itself from being removed. What is more, XP Defender 2013 stays active in Safe Mode and Safe Mode with Networking, so it’s not that easy to game this fake antivirus program. But don't worry, it's still possible and we will show you how.

    A screenshot of a fake virus-bearing 'security' utility, XP Defender 2013.


    While running, this 'nasty' ware displays explicit security warnings claiming that you have a computer infected with viruses, spyware, Trojans and other severe infections that may steal your personal information or even credit card details. As a matter of fact, XP Defender 2013 tries to trick the victim into giving up their credit card number and other personal information. Very important: don't run any advertised scans or follow any instructions displayed in the fake scanner or security pop-ups.


    Cyber crooks create software that impersonates typical Windows security notifications, for example Windows Security Center pop-up. We bet this window looks familiar to you, right? The only problem is that this window is completely fake and promotes rogue antivirus program. Unsuspecting user may fall victims to this scam and install malware. And you don't want that because cyber crooks have already stolen more than $97 Million dollars over this year using fake antivirus software.


    Here's another example of a fake security pop-up that actually looks like a real thing, you know, a system notification. This one claims that 'data loss, identity theft and system corruption are possible'. Bu there are many more of these fake alerts, and they show up randomly, just to scare you into thinking that your computer is infected.


    Not only XP Defender 2013 issues repeated warnings that your computer is being used to spread malware and attack other machines, then demands that you purchase the latest version to remove the 'virus' but also modifies Windows registry, so badly that you have to fix it first before you can actually run any anti-malware software.

    Here's a XP Defender 2013 'secure transaction processing' window where you can purchase the rogue program. Cyber crooks apparently accept Visa and Master Card. Best offer + Life time support would cost your about 100 bucks. They also added Positive SSL and Comodo Hacker Shield graphics to add some extra credibility but obviously none of those companies would actually issue valid certificates for scammers. We could say this is a great example of technical and social engineering attack.


    Ok, so now you know how this rogue antivirus works and how scammers steal money for unsuspecting users. Let's proceed to the most important part of this article: XP Defender 2013 removal instructions.

    Below, you will find three possible ways how to remove XP Defender 2013 malware from your computer. If you have any further questions please let us know - we will be happy to assist you. Good luck!


    Quick XP Defender 2013 removal:

    1. Use 3425-814615-3990 to register the rogue antivirus application in order to stop the fake security alerts.


    Just click the Registration button and then select Activate Now. Don't worry, this is completely legal. If the debugged serial keys do not work anymore, please follow the alternate removal instructions below.


    Once this is done, you are free to install recommended anti-malware software and run a full system scan to remove XP Defender 2013 from your computer properly.

    2. Download recommended anti-malware software (Spyware Doctor) and run a full system scan to remove this virus from your computer.


    Alternate XP Defender 2013 removal instructions:

    1. Open Windows Explorer. It could be any window, for example My Computer.


    2. In the Address bar type: http://goo.gl/AXIrU (this is a download link for FixNCR.reg) and click hit Enter or click Go to download the file.

    5. Save FixNCR.reg to your Desktop. Double-click on FixNCR.reg to run it. Click "Yes" for Registry Editor prompt window. Click OK.


    7. Download recommended anti-malware software (Spyware Doctor) and run a full system scan to remove this virus from your computer.

    NOTE: With all of these tools, if running Windows 7 or Vista they MUST be run as administrator. Launch the program and follow the prompts. Don't forget to update the installed program before scanning.


    Manual XP Defender 2013 removal instructions:

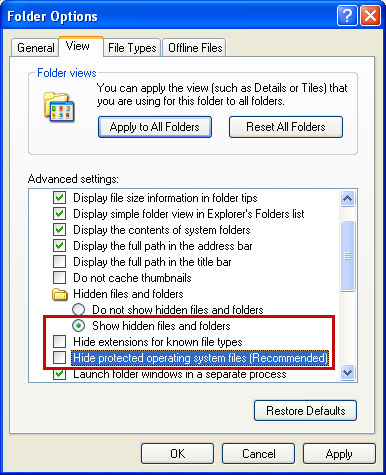
    Make sure that you can see hidden and operating system protected files in Windows. For more in formation, please read Show Hidden Files and Folders in Windows.

    Under the Hidden files and folders section, click Show hidden files and folders, and remove the checkmarks from the checkboxes labeled:
    • Hide extensions for know file types
    • Hide protected operating system files
    Click OK to save the changes.


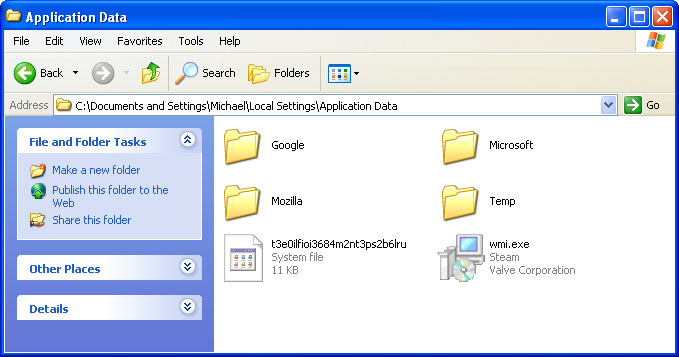
    1. Go into C:\Documents and Settings\[UserName]\Local Settings\Application Data\ folder.

    For example: C:\Documents and Settings\Michael\Local Settings\Application Data\


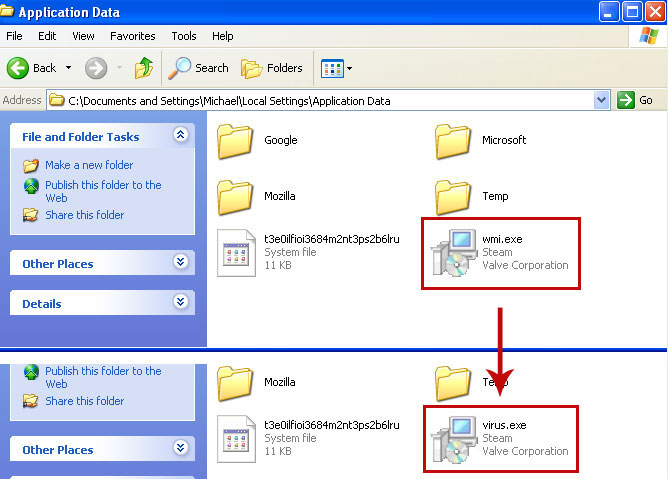
    2. Find hidden executable file in this folder. In our case it was called wmi.exe, but I'm sure that the file name will be different in your case. Rename wmi.exe to virus.exe and click Yes to confirm file rename. Then restart your computer.


    3. After a restart, copy all the text in bold below and paste to Notepad.

    Windows Registry Editor Version 5.00

    [HKEY_CLASSES_ROOT\.exe]
    @="exefile"
    "Content Type"="application/x-msdownload"

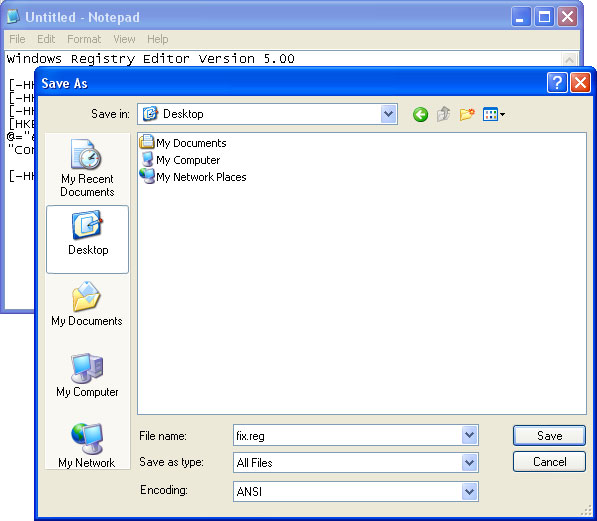
    4. Save file as fix.reg to your Desktop. NOTE: (Save as type: All files)


    5. Double-click on fix.reg file to run it. Click "Yes" for Registry Editor prompt window. Then click OK.

    6. Open Internet Explorer. Download xp_exe_fix.reg and save it to your Desktop. Double-click on xp_exe_fix.reg to run it. Click "Yes" for Registry Editor prompt window. Click OK.


    7. Download recommended anti-malware software (Spyware Doctor) and run a full system scan to remove this virus from your computer.

    NOTE: With all of these tools, if running Windows 7 or Vista they MUST be run as administrator. Launch the program and follow the prompts. Don't forget to update the installed program before scanning.

    Tell your friends: